A classic recipe for meringue cookies! These little meringues only call for 5 ingredients, and at under 25 calories a pop they are easily the lightest recipe on my blog! The technique takes a little bit of practice, and a long time in the oven, but I’ll walk you through the steps in the recipe so that you can make your own perfect meringues!
Sweet & Simple Meringue Cookies
I have another recipe for your holiday cookie tray today — classic meringue cookies!
Meringues only require 5 ingredients to make, but they can be a little bit finicky — even the weather can affect them. Winter is a great time to try them out, as you’re much less likely to have a very humid day this time of year, and humidity is one of the greatest nemesis of meringue cookies.
I’ve been making this recipe over and over again the past few months to make sure that I understood all of the ins and outs of making perfect meringue cookies, and I’m finally ready to share what I’ve learned with you, so that you too can make these addictive little meringue cookies.
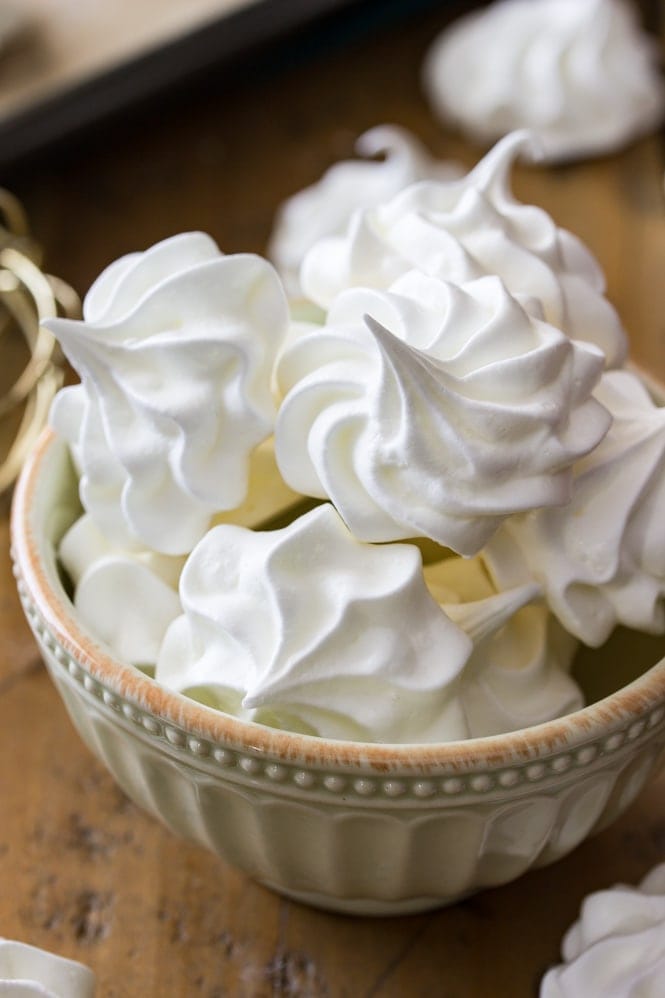
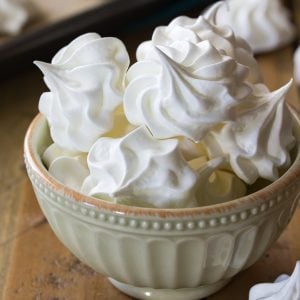
If you’ve never had one, meringues are light, airy cookies with crisp interiors. I’m sharing a classic vanilla meringue recipe today (with notes on how to add your own different flavors!). The taste always reminds me of marshmallow 😍.

Making Meringue: Stiff Peaks
This recipe calls for four egg whites and a single cup of sugar. That may not seem like it’s going to yield you very many meringues when you start, but you’ll be surprised by how much these ingredients increase in volume.
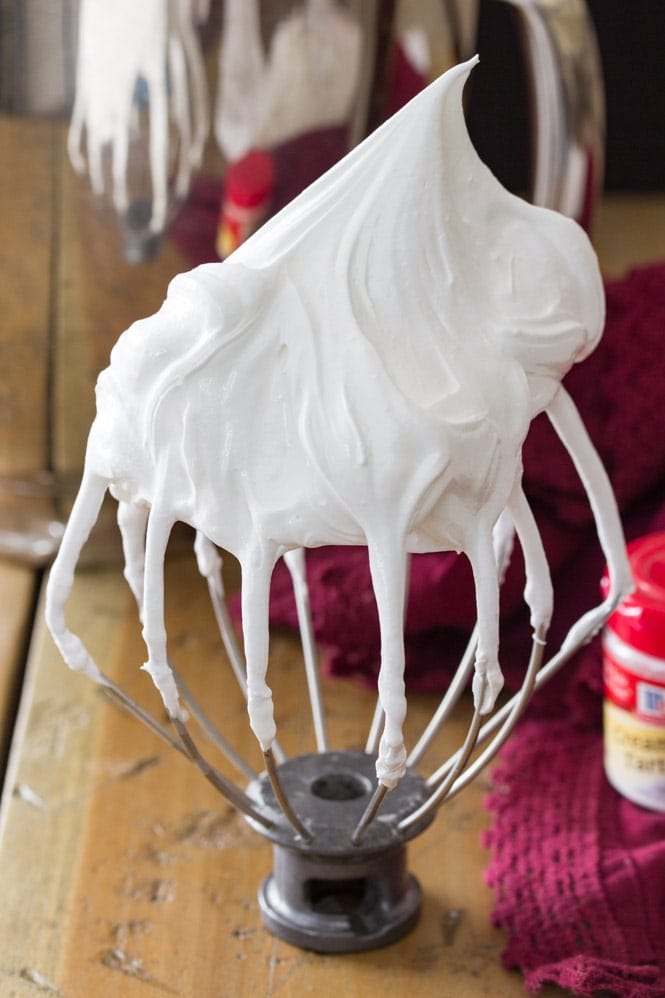
As you add the sugar, the mixture will become thick, glossy, and sticky, that’s exactly what you are looking for! You’ll also want the mixture to achieve stiff peaks — that’s how you’ll know that it’s done.
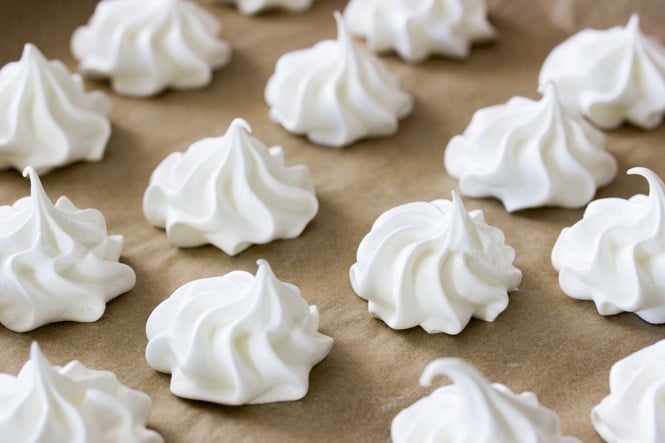
If you’ve made my angel food cake, whipped cream, or Swiss meringue buttercream before, then you’re already familiar with the concept of stiff peaks. It means that when you turn the batter over (like you can see in the image below with the meringue cookie batter), the peak that forms stands tall and does not fold back into itself. I’ve included a video in today’s post so you can see exactly how the meringue should look, in case you haven’t ever made meringue before.
Tips for No-Fail Meringue Cookies
- Make sure that the bowl and beater that you are using to beat your meringue is completely grease and moisture free. Any moisture can ruin your meringues.
- Crack your eggs in a separate bowl when separating the whites. Even a tiny bit of yolk can ruin your meringues, so crack each egg in a small bowl before adding it to the bowl that you will be mixing the meringue batter in.
- Add the sugar gradually, one Tablespoon at a time, and give it a chance to dissolve before adding more.
- You can test that the sugar is completely absorbed by taking a small bit of the batter and rubbing it between your fingers — if it’s not, it’ll feel gritty.
- Don’t stop until you get stiff peaks. The batter will take several minutes, at least, of beating to achieve stiff peaks, but keep going. It will increase in volume and be very thick and glossy — that’s what you’re looking for! See the photo above or the video for a visual.
- Don’t over-beat your batter, either! Once you hit stiff peaks, stop! You can stir in your extract and any food coloring at this point, but don’t push it because over-beating the batter is just as bad as not beating it enough.
- If you’ve found that your meringues have gotten soft after you finished baking them, you can actually pop them back in the oven at 225F for another 10-20 minutes (watch them, if they begin to turn golden brown around the edges turn off the heat immediately) and then let them cool in the oven for another hour, this has always worked for me with meringues that start to get chewy.
Adding Color and Other Flavoring
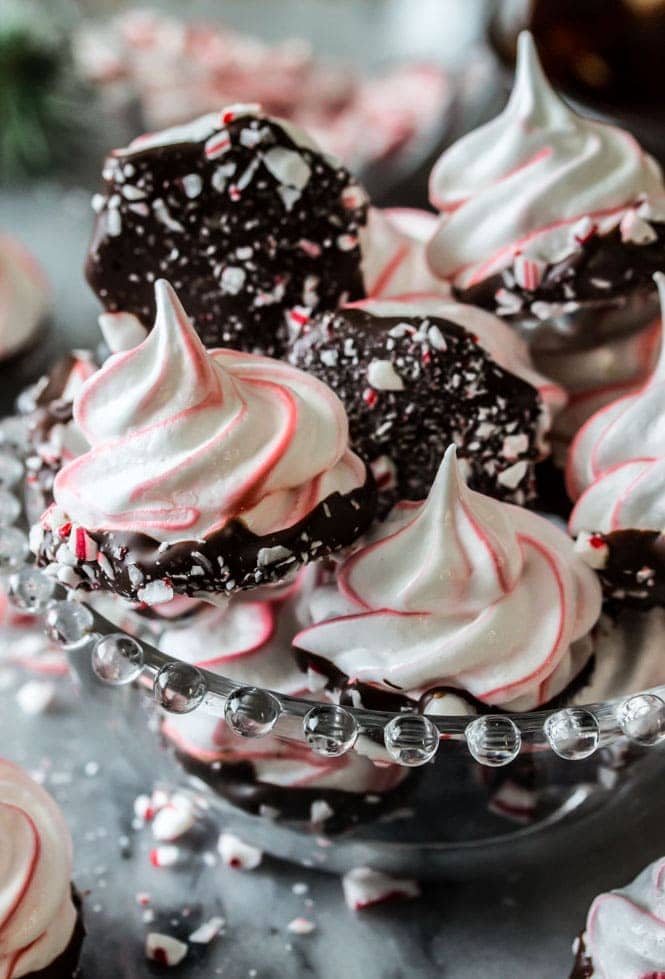
Once you get the hang of making meringues, feel free to play with lots of different flavors and colors — I made these Peppermint Bark Meringues by adding ¼ teaspoon peppermint extract, striping the piping bag with red food coloring (I used a clean paintbrush that I only use for baking), and dipping the baked, cooled meringue cookies in dark chocolate and crushed peppermint pieces!
Enjoy!
More Christmas Treats You Might Like:
Meringue Cookies
Ingredients
- 4 large egg whites room temperature
- ½ teaspoon cream of tartar
- ⅛ teaspoon salt
- 1 cup (200 g) granulated sugar
- 1 teaspoon vanilla extract¹
Recommended Equipment
Instructions
- Preheat oven to 225F (105C) and line a large cookie sheet (or two regular-sized cookie sheets -- make sure they will fit in your oven together) with parchment paper. Set aside.
- Combine egg whites, cream of tartar, and salt in a large, completely clean, completely grease-free bowl².4 large egg whites, ½ teaspoon cream of tartar, ⅛ teaspoon salt
- Using an electric mixer or a stand mixer (with either the whisk or paddle attachment), stir on low speed until mixture becomes foamy.
- Increase speed to high.
- With mixer on high, gradually add sugar, about 1 Tablespoon at a time, stirring after each addition until sugar is dissolved (about 15-20 seconds between each addition).1 cup (200 g) granulated sugar
- Beat until mixture is thick, shiny, and has increased in volume. Mixture should have stiff peaks and sugar should be completely dissolved (you can test this by rubbing a small bit of the mixture between your fingers, if it feels gritty, the sugar isn't dissolved).
- Stir in vanilla extract and any other extract you may like to use. If using food coloring, add the food coloring at this stage, too.1 teaspoon vanilla extract¹
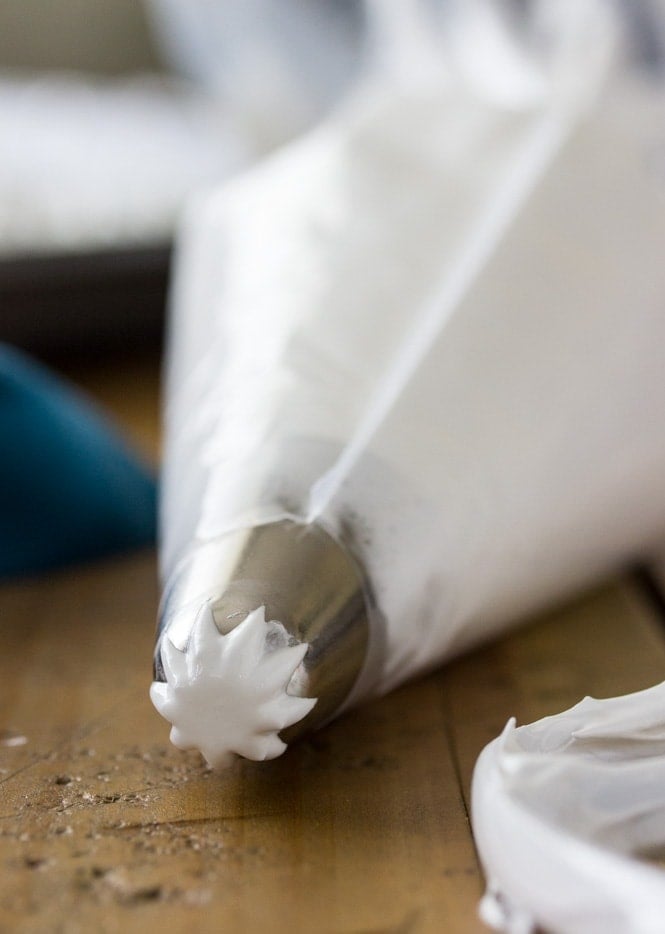
- Fit a large disposable piping bag with a large tip (I used Ateco 846, but any large star tip will work or you can just snip the edge of the piping bag for a “kiss” formation) and transfer meringue to prepared piping bag and pipe onto prepared cookie sheet. The meringue cookies can be pretty close to each other as they won’t spread, and you will want to bake all of the cookies at the same time, so make sure you make enough space.
- Bake on 225F (105C) for 1 hour. Turn off the oven once the baking time has passed, and do not open the oven. Leave the oven door closed and allow cookies to cool completely in the oven (1-2 hours) before removing.
- Meringue cookies should be crisp and can be stored in an airtight container. Keep away from heat and moisture as it can soften your meringues.
Notes
Recipes to use those leftover egg yolks:
Nutrition
Nutritional information is based on third-party calculations and should be considered an estimate only. Actual nutritional content will vary based upon brands used, measuring methods, cooking method, portion sizes, and more.


B
I use the recipe on the regular, and they’re always gone in a day! I add in 1/2 of almond extract and it adds a nice flavor as well
Barbara
These were delicious! Thank you for the recipe.
Emily @ Sugar Spun Run
We’re so happy you loved them Barbara ❤️
Nadege
I did these with brown sugar and they turned out so good! I don’t even like meringues but I had a carton of egg whites that was going to expire so I did these. I also substituted the cream of tartar with lemon juice. They are so delicious, they will be harder to resist than I anticipated!
For the sugar, I used the cup measurement instead of the grams as it looked so much! For 5 egg whites, I used 1.25 cup brown sugar, which turned out to be 158 g. They came out perfect and left a vanilla-caramel smell in my condo. Loved it!
Lucy
If I halve the recipe, will the baking time change? Thanks!
Sam
Hi Lucy! The bake time will remain the same as long as your cookies are the same size. You will just have fewer. 🙂
Brandi
Have you used bakery emulsion flavorings for this recipe? I would be interested to know if they work ok for it or if I will just have to experiment.. thanks!
Sam
Hi Brandi! You will want to make sure they aren’t made with oil. If they aren’t made with oil, the emulsions should work just fine. 🙂
Zoey
Did right amount of ingredients, followed directions exactly, and cleaned all my supplies but the mixture would not become stiff glossy peaks. I put it on high for 15 minutes, and had to turn it off because the noise was becoming unbearable to my family. Please help!
Sam
Hi Zoey! I’m so sorry to hear this happened! Was there any moisture present anywhere by chance?
Noemi
Well i followed this recipe to the T. The cookies burned on 225 F in 35 minutes!! My whole work was ruined. I should have followed my grandma’s recipe and dry them out on 170 f with open doors.
Sam
Hi Noemi! I would buy an oven thermometer and check that the temperature is right. They should not be burning that quickly so I suspect your oven is running much hotter than it lets on.
FRANCIS
I made this on New Year’s Eve and they turned out great. My 4th attempt and finally success!!! Many thanks!
Rebekka
My Lady and mother in law approved!! 🥳 they turned out wonderful!! And gives me a great way to practice my piping skills. Can’t wait to experiment with flavors!
Emily @ Sugar Spun Run
Yay! Let us know which is your favorite once you do 🥰
Chuck, Claire and Chip
Ours don’t quite look like yours but WOW are they GOOD!
Our son remembers when I made these a few years ago (1970s 😁) and asked if he could come over to our house and make some with us. Best Christmas present ever. He’s never baked cookies before. Time he learned. 😊🎄
L2D2
Mine came out hard and chewy.
Sam
Oh no! Unfortunately if they were chewy it sounds like they were under-baked or exposed to humidity. Fortunately you can remedy the chewiness even after the fact, just pop them back in the oven for a bit 🙂
Andrea
Great and recipe! First time making meringues even though my mom made them my entire childhood. They turned out perfectly and I added some sprinkles on a few. Thank you!
Emily @ Sugar Spun Run
Thanks so much for using our recipe, Andrea! We are so glad you like the cookies 😊
Vicki K
Hi there! I think this was a great recipe, thank you! My question is this: once I add the vanilla, the color becomes more of an ecru shade and they aren’t pure white like the ones on the website. Is there a way to keep them looking more snowy? Thanks!
Emily @ Sugar Spun Run
Hi Vicki! You could use a clear extract instead 😊
Vicki K
Ah! I never think of that since I use my usual vanilla extract for all my baking. Thanks for reminding me of that option!
Halima
Hello, I’m going to attempt these this week. I was going to dip the bottoms in melted peppermint Hershey kisses. Will this affect the storage or their crispness? Also, wanted to drop some candy cane bits on top. When should I do that, before baking? Thank you!
Sam
Hi Halima! These do hold up well to being dipped in chocolate. I wouldn’t add them before baking, they’ll melt. You could crush them and dip the chocolate in the crushed candy canes like I have pictured in my post. 🙂
Jean Vangsness
I am going to try these this week. How long will they keep in a tightly closed container? Hoping they will last until Christmas…
Emily @ Sugar Spun Run
Hi Jean! These are typically good for a couple of weeks in an airtight container. If they become chewy, you can pop them back in the oven for a few minutes to crisp them back up. 🙂
DSWPOODLES
We’ve made this for years. Usually we do not use a piping bag. Way too much trouble when the kids are waiting to eat them. LOL I also have added chocolate chios & pecans. We’ve also tried them with toffee chips, butterscotch, or caramel. really just any thing you like. My aunts recipe, the first one I ever used did not call for cream of tartar. It was only egg whites, sugar, vanilla ( or flavoring of your choice- extract) and a pinch of salt. They were called Forgotten Cookies. ( or Fake Divinity). I had pecan trees so used pecans but it can use any kind of nut you like if you want nuts. I’ve added dried fruits to it too. I just chipped them up real small & after whipping the, hand stirred the fruit and nuts. For 4th of July, candied red cherries & dried blueberries- Valentines Day, Candy red hearts in the center, Christmas, red & green canded fruits, B’days sprinkles)I’ve also let the cookies almost set, then used a finger to indent, stuck in peanut butter,, Hershy Kiss, cherries, or jam- again, just used what I thought of right then. Different flavorings give you a new taste almost. When I used lemon flavoring,- use lemon curd in the center Or I put a bit of mango & pistachio or mix with coconut & dried pineapple. It is always fun to play around with recipes and discover your own new favorite type. We always used a teaspoon to to to make them but the kids would use tablesppons to make them biagger. We also prehated the oven to 350 then turned it off.I’m going to try the oven setting lower just to see if it is better.
Randall
The hardest part of this recipe is getting the meringue into the piping bag! What a mess I made.
Tess
If you put your piping bag into a tall glass the fold the top over the edge it bakes it easier to fill
Lisa
I use this tip all the time myself, so I second this recommendation! It is a total breeze to fill a piping bag (or a Ziploc bag) using a tall glass. I use my large Tervis tumbler and it works great!
Vicki K
OMG, me too. I wound up dolloping with a spoon instead.
Nan S
Delicious and pretty easy as long as you follow the tips. My family absolutely loves these.