
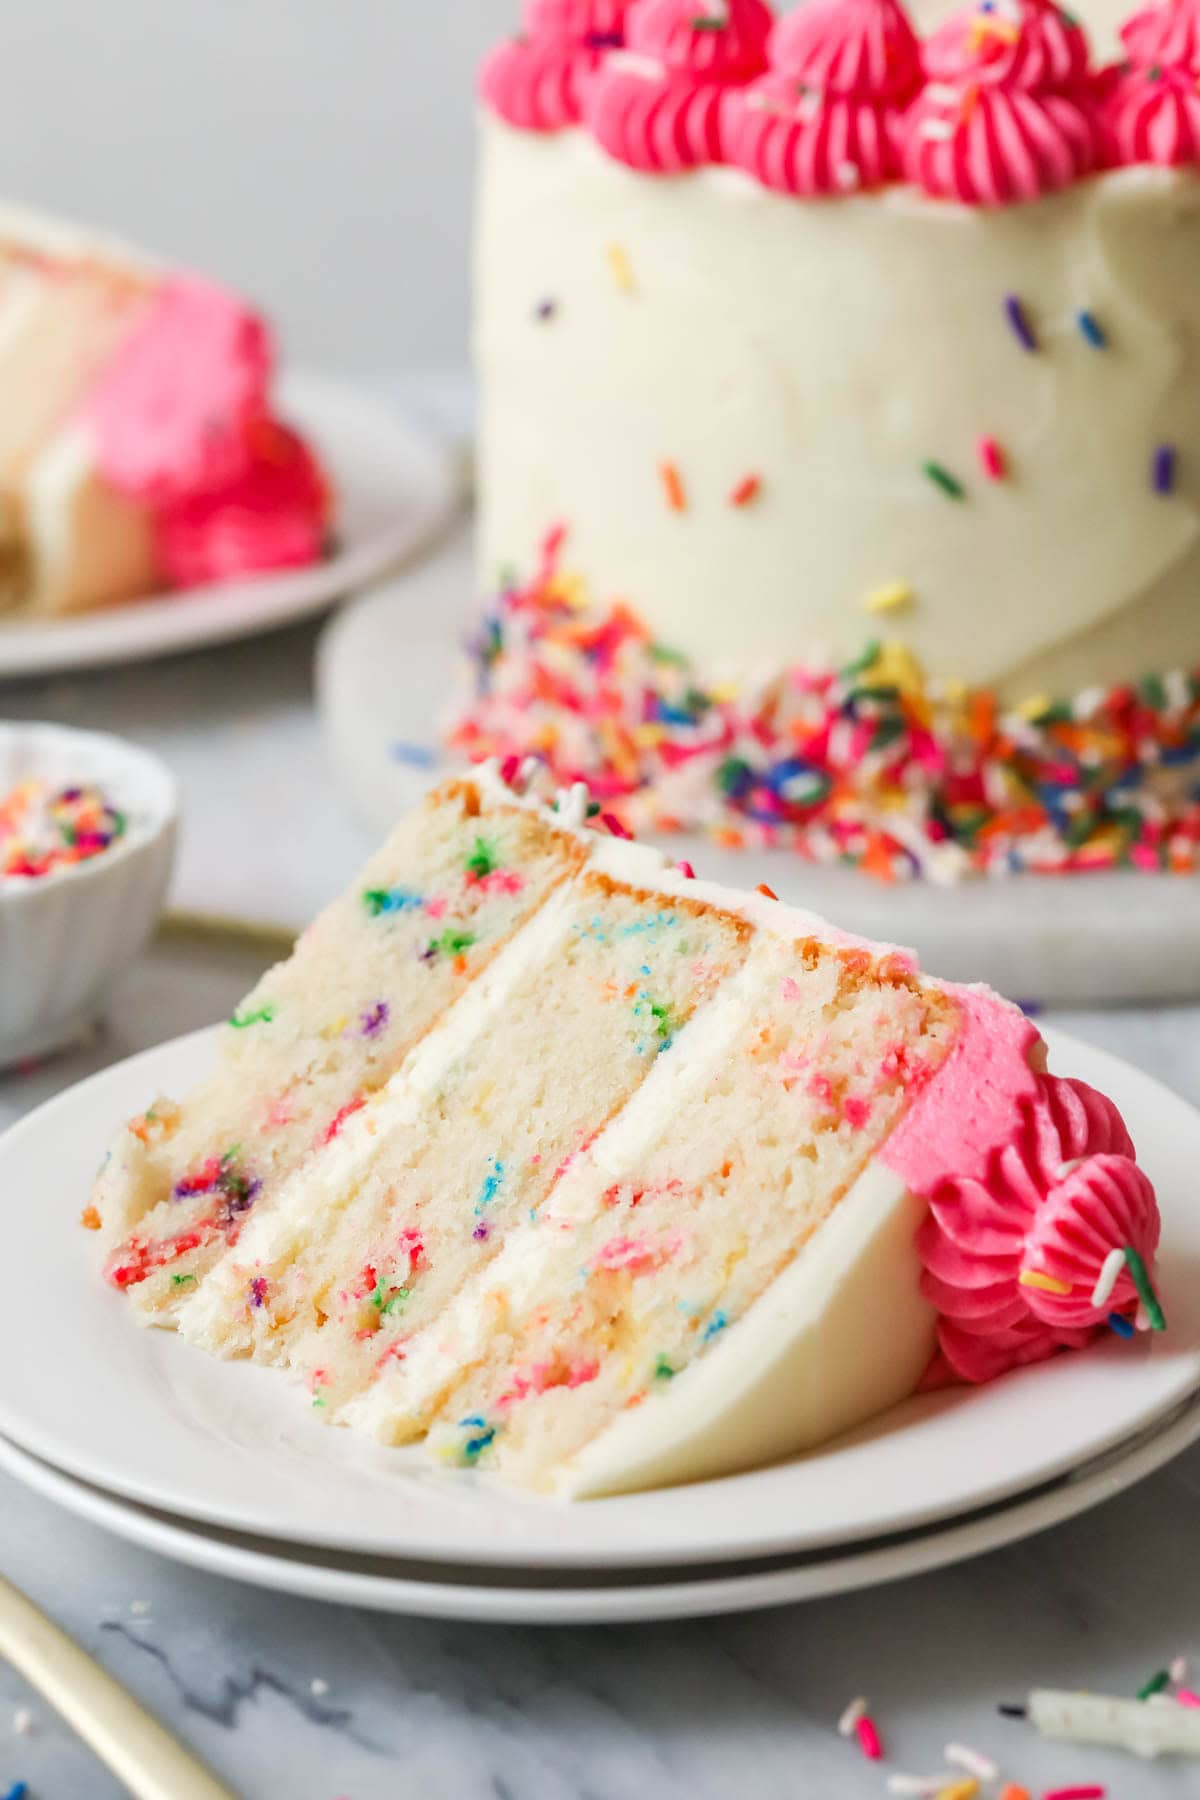
My light and fluffy, completely from scratch Funfetti cake recipe has over 600 five-star reviews and has even been featured on TV! ⭐️ It’s a soft white cake speckled with sprinkles and iced with buttercream frosting, perfect for beginners and advanced bakers alike. Makes the perfect homemade birthday cake! Recipe includes a how-to video!
Homemade Funfetti Cake Recipe
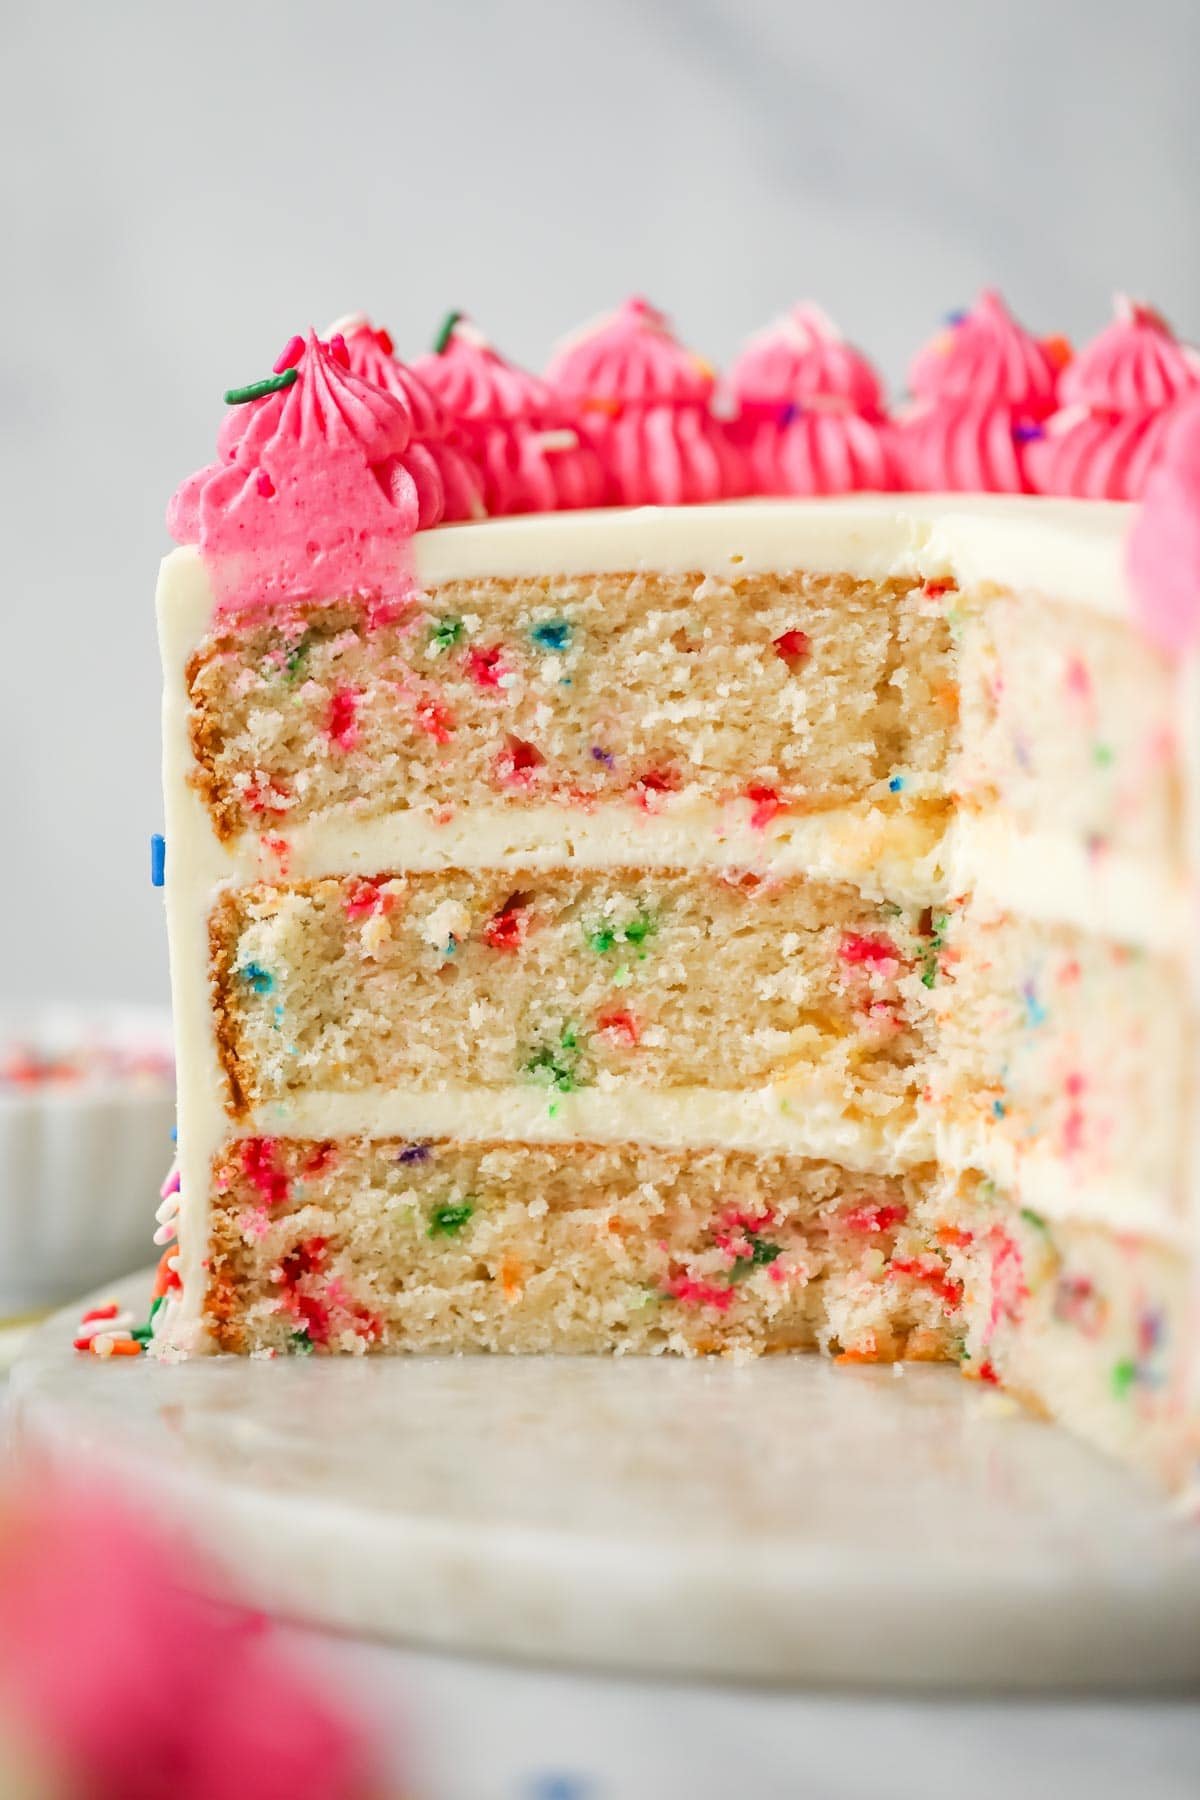
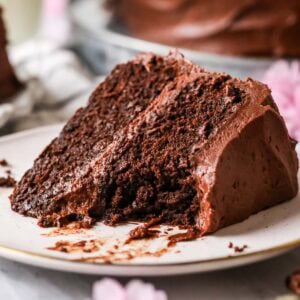
My fluffy Funfetti cake (also known as confetti cake) has been one of my most popular recipes for years (right up there with my “worst” chocolate chip cookies). Flecked with sprinkles, a plush, super soft texture, and a buttery, caramelized vanilla flavor–what’s not to love?
Developing this cake took me weeks and is still one of my proudest accomplishments (right there with my French macaron recipe). When I finally nailed it, I found that there were a few key ingredients that really made a difference, namely, whipped egg whites.
For maximum, fluffy softness (and snow-white color), this recipe calls for plenty of egg whites (and no egg yolks–save those for your tiramisu!). You’ll whip these separately with an electric mixer until they reach stiff peaks and then fold them (gently!) into the cake batter. This is easy and quick to do, and it’s critical for a light and fluffy white cake (don’t get me started on yellow Funfetti cakes–there should be no such thing!).

Why You’ll Love This Recipe
- Perfect taste, perfect texture. Largely thanks to the afore-mentioned whipped egg whites and a combo of butter and oil in the cake batter. Oil adds moisture, while butter adds flavor, so by mixing the two you achieve perfect balance. This is how I’ve designed so many of my cake recipes, and once you try it you’ll see why.
- Bright white color. This serves as the perfect backdrop to colorful sprinkles. This Funfetti cake gets its pristine color from using egg whites only, clear vanilla (instead of regular vanilla), and a neutral oil.
- So soft and fluffy. This gorgeous texture comes from a critical ingredient: whipped egg whites. I’ve repeated this technique in several recipes since, including my lemon cake, strawberry cake, and Oreo cake. All have a plush, light-as-air texture!
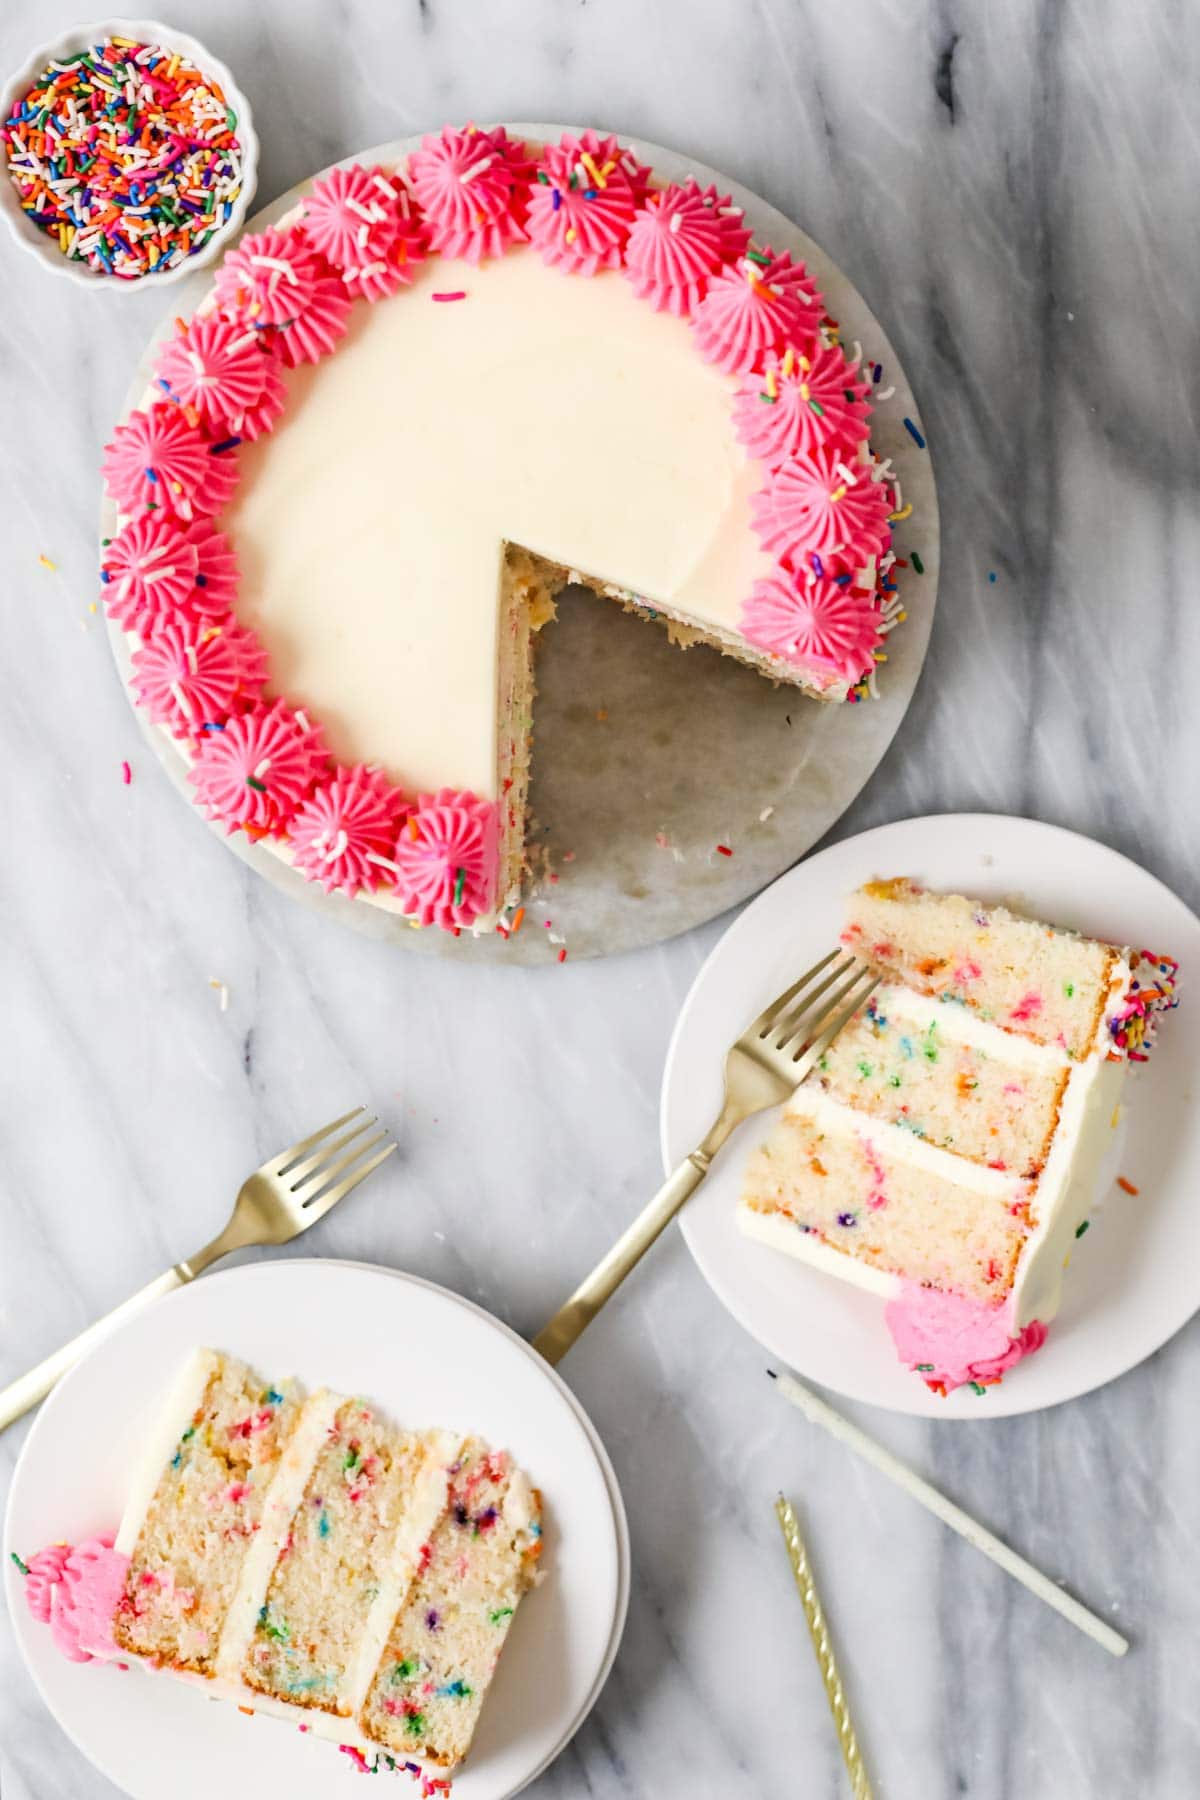
- Frosted with an easy peasy classic buttercream, though you could technically use any frosting you like. Fruity pebbles frosting, strawberry frosting, and cream cheese frosting are all nice alternatives!
What You Need
For the Cake Layers
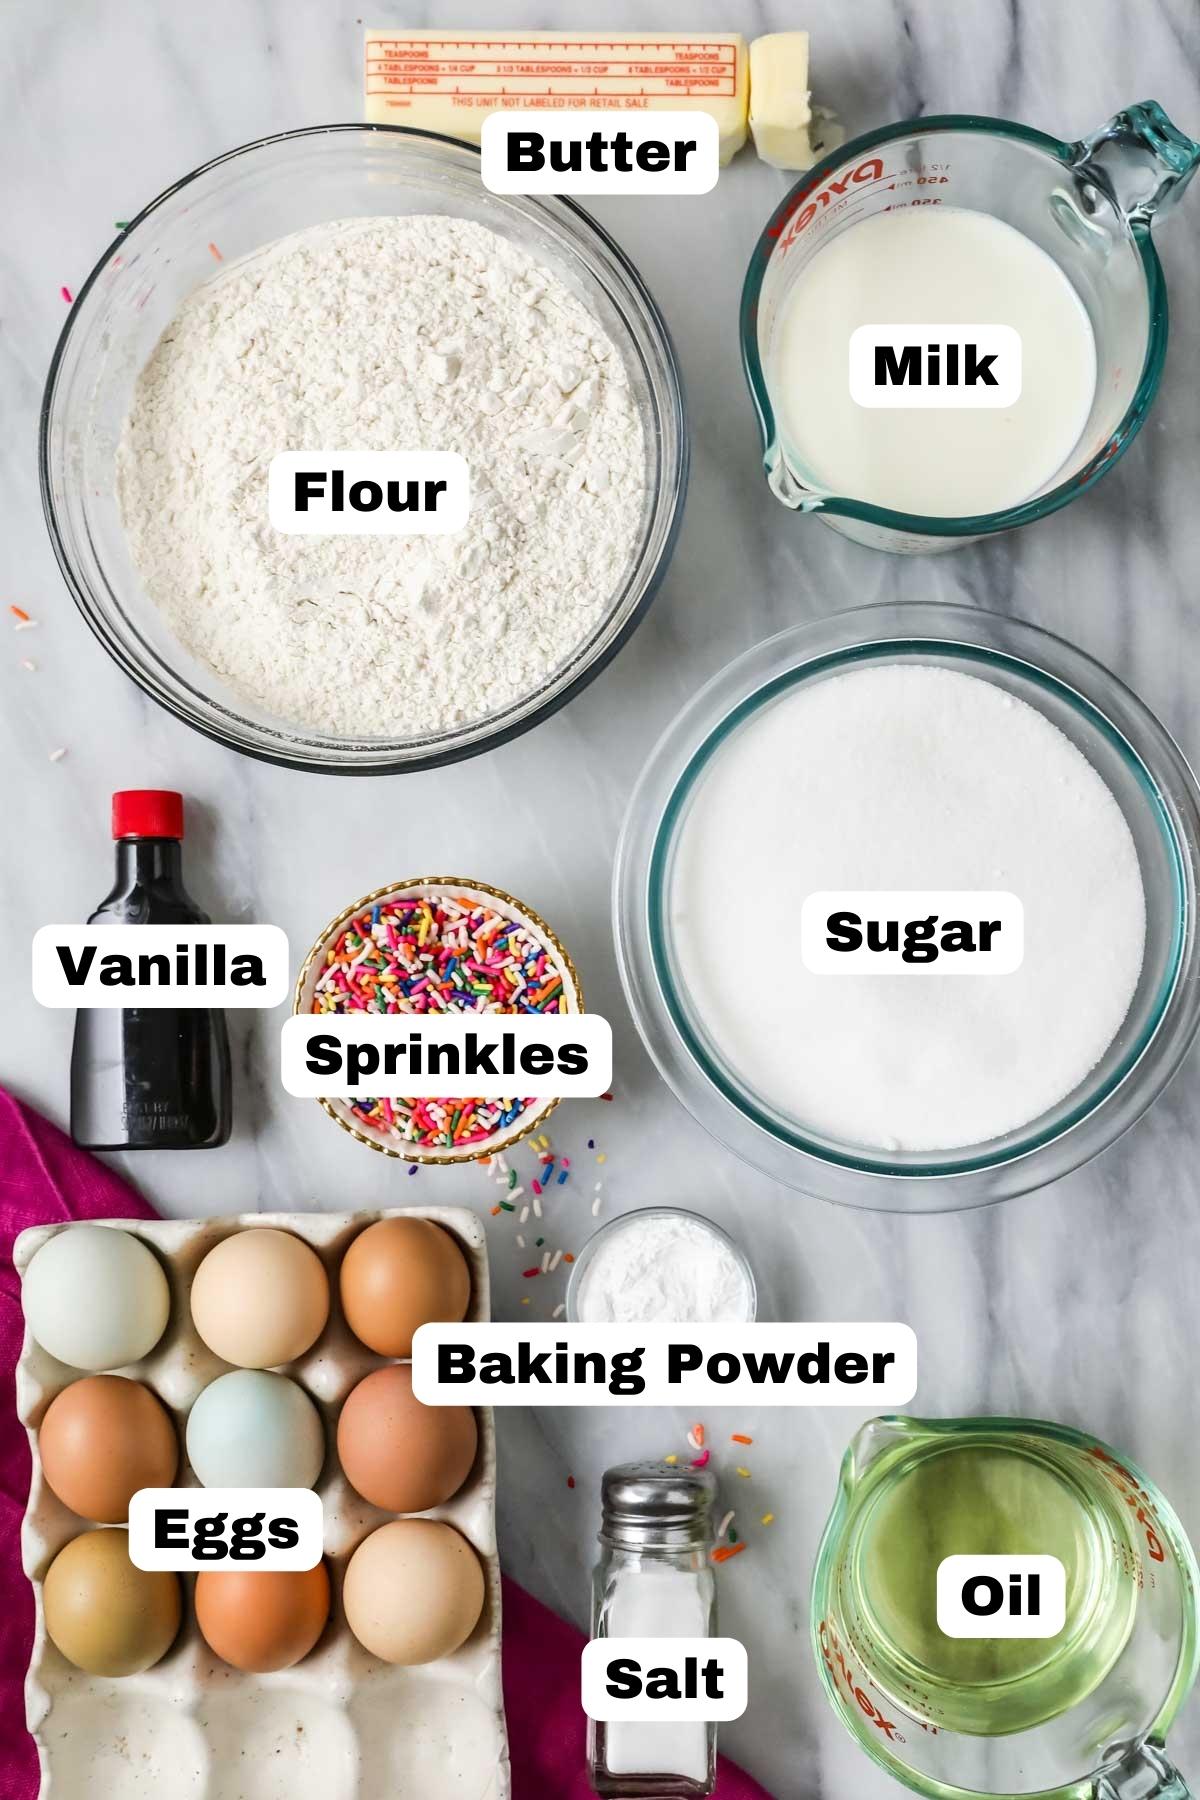
- Flour. Back when I was first developing this recipe, cake flour was difficult for me to find and when I could, it was pricey. I developed this recipe specifically with the intention of achieving a light fluffy texture with regular ol’ all-purpose flour (and it worked *perfectly* if I do say so).
- Egg whites. It’s important that you separate your own eggs (do not use eggs from a carton) and make sure not to get even a drop of yolk in the whites. Room temperature eggs work best, so try to remember to set yours out ahead of time if you can. If you forget, use my trick to quickly bring eggs to room temperature (just make sure to thoroughly dry the eggs before cracking them).
- Milk. Whole milk is my preference, but I suspect a milk substitute (like almond milk) would work just fine. Whatever you use, ideally let it come to room temperature before adding it.
- Butter & oil. As mentioned above and used in my white cake and vanilla cake, a blend of the two balances flavor and texture of this Funfetti cake perfectly. For the oil, opt for a neutral cooking oil like canola, vegetable, or avocado oil (I like avocado oil, but it’s a bit more yellow and so colors the cake slightly). Using a particularly yellow butter or oil can affect the color of your cake.
- Baking powder. Not baking soda! It will seem like a lot, but it’s not (we’re making a big cake!). There is no baking soda in my Funfetti cake recipe, and that’s intentional. While this isn’t the main reason I don’t use baking soda, baking soda encourages browning and adding it would actually make the cake more golden inside.
- Vanilla. To maintain that pristine white color, I use clear vanilla in the cake layers. If you would rather opt for natural vanilla flavoring it will work perfectly well, just know your cake may be tinted a bit more golden.
- Sprinkles. Your sprinkle choice matters! Nonpareils can bleed into your batter and ruin that pristine white color. Stick with jimmies or quins–they add color without any bleeding.
SAM’S TIP: If you want to use cake flour instead of all-purpose flour, you must substitute properly. If you are using weights, the weight is the same; if you are using cups, you will need 4 ½ cups of cake flour.
Frosting
This is a big three-layer cake, so you will need quite a bit of frosting to cover and decorate it. Just giving you a fair warning before anyone is alarmed by the amount of butter you’re about to see 😉.
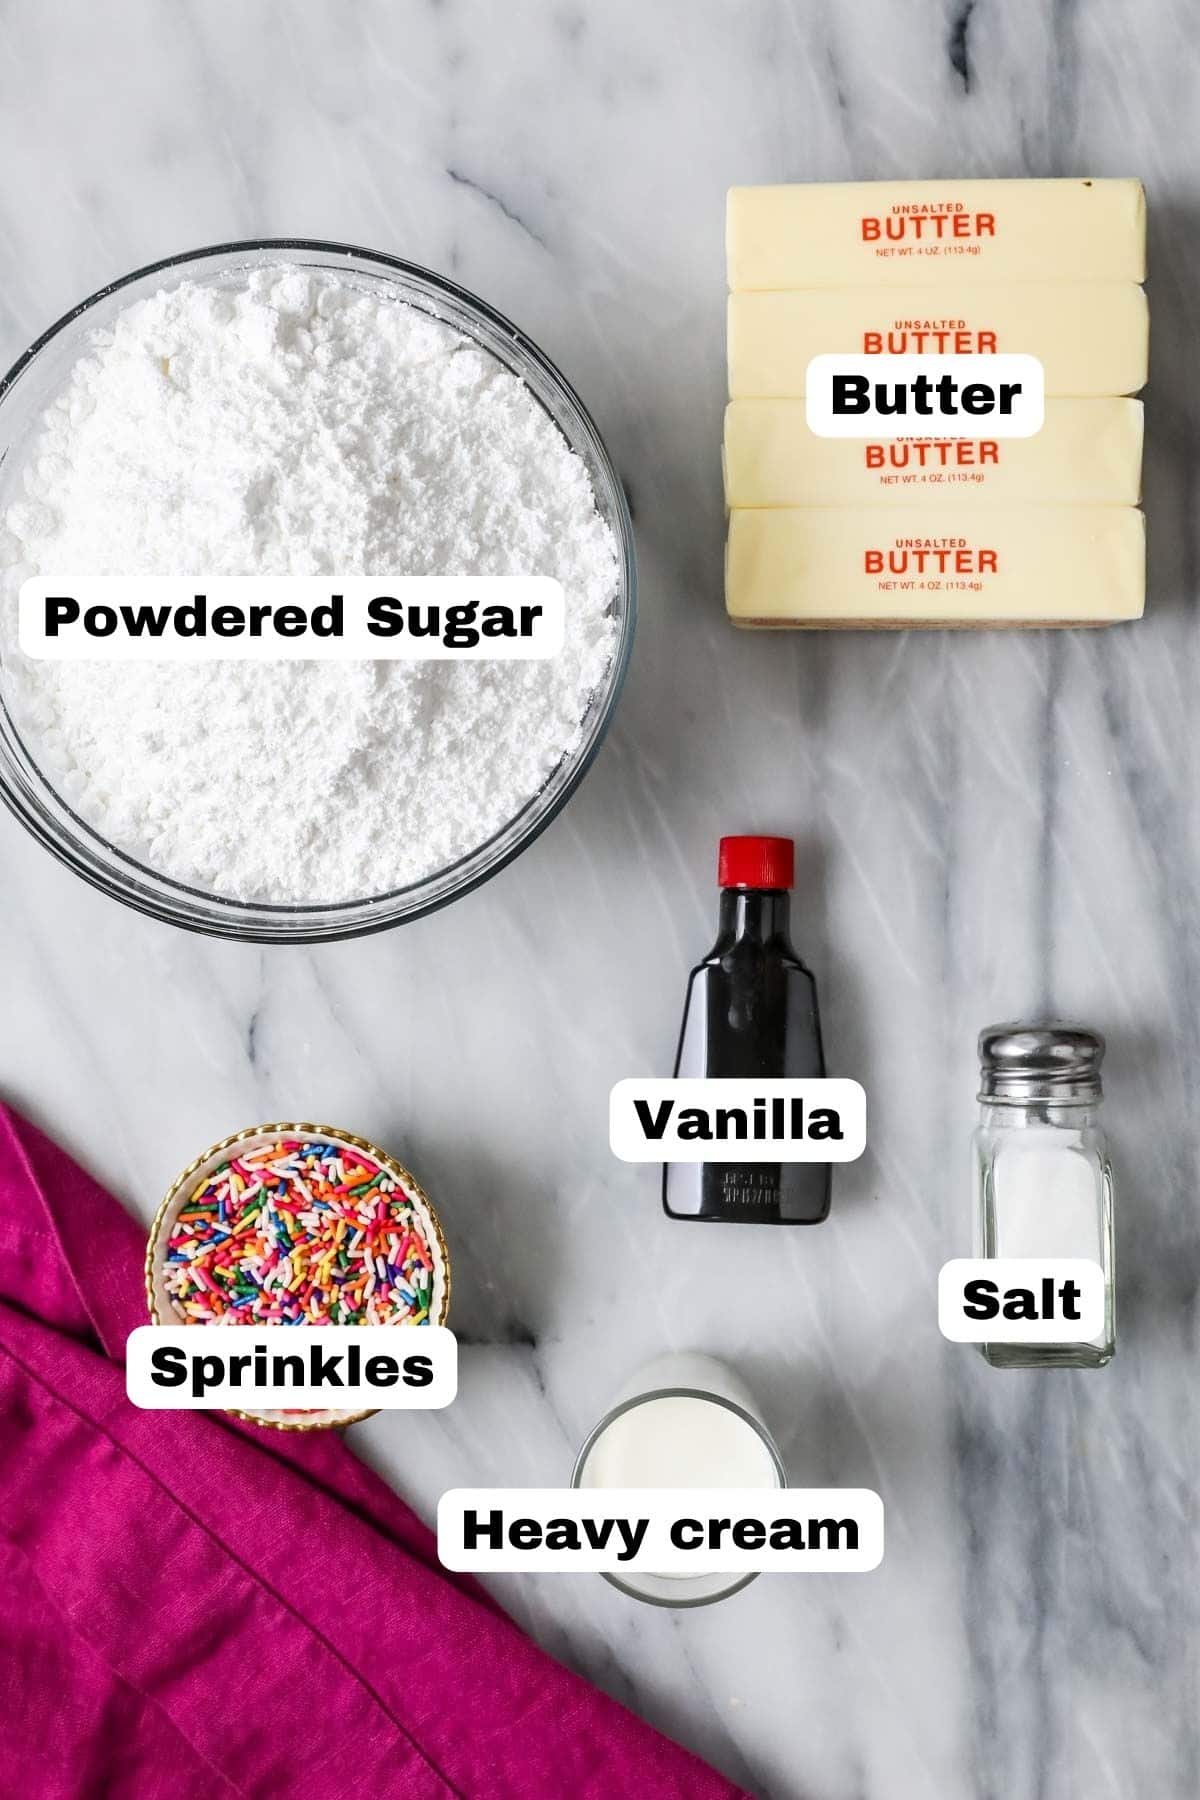
- Butter. Yes, we are using a full pound (or four sticks) of butter here. Remember, this is a big Funfetti cake! I use unsalted butter and add salt separately, but if you use salted butter you likely won’t need to add any salt (taste-test the frosting and add a inch if needed — salt helps cut the sweetness and deepen the flavor).
- Powdered sugar. I highly recommend measuring your ingredients with a kitchen scale for the most accurate results (I link to the one I use in the recipe card, it’s inexpensive). It can be very easy to over-measure powdered sugar, much like measuring flour!
- Heavy cream. We’ll whip this into the frosting for a light and fluffy texture. Whipping cream or double cream would also work.
- Flavoring. For the frosting, I sometimes like to use Princess emulsion instead of vanilla (I also use this in my frosted animal cookies–another fun recipe). It accents the buttercream with notes of citrus and almond and keeps it from being overbearingly sweet. If you don’t have any or can’t find it, regular vanilla extract works perfectly.
SAM’S TIP: For that popular Milk Bar birthday cake look, frost your funfetti cake scantly on the outside and top with my confetti crumbs!
This is just an overview of the ingredients I used and why. For the full recipe please scroll down to the bottom of the post!
How to Make Funfetti Cake
Make the batter
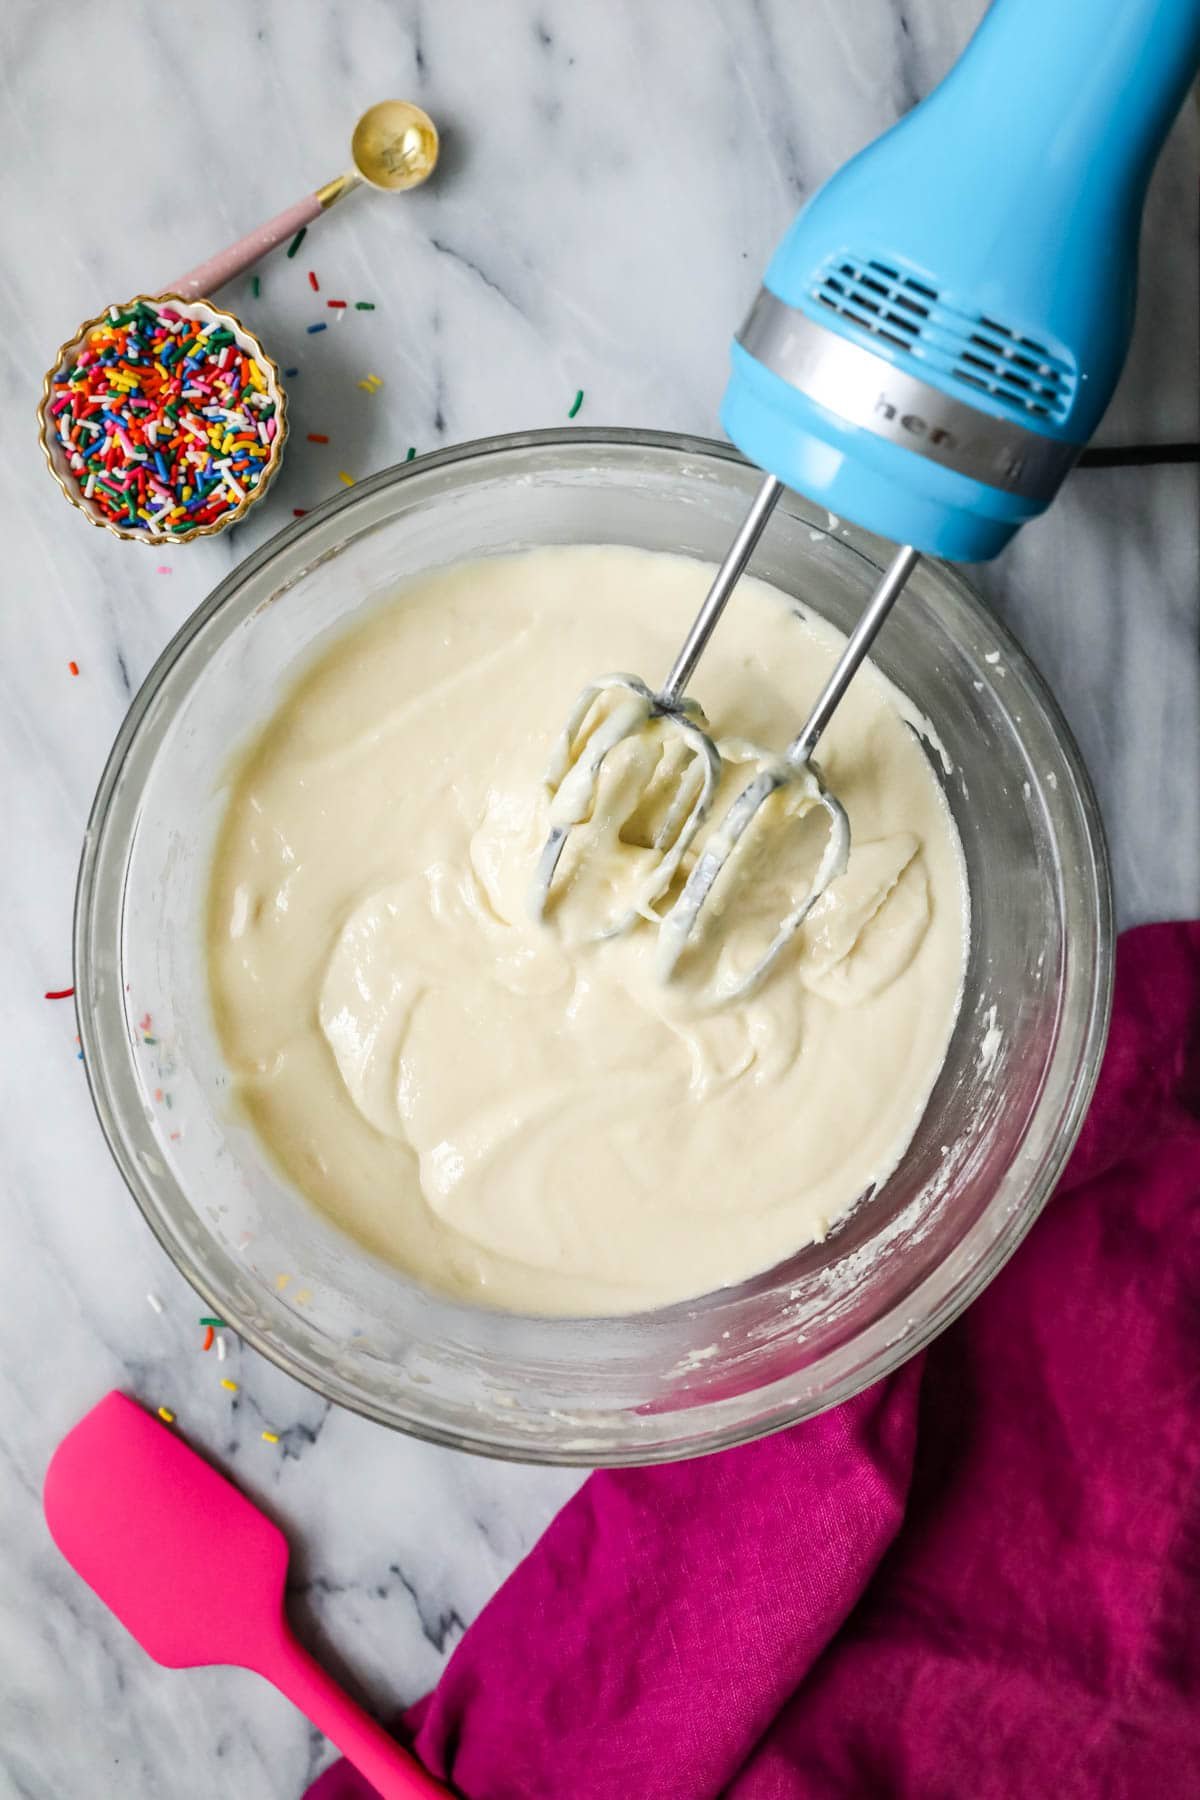
When making the batter, you’ll want to start with an electric mixer or a stand mixer (fitted with the paddle attachment) to combine all of your ingredients thoroughly and properly. Creaming the butter in the beginning is actually important for the best texture.
You want to make sure everything is well-combined, but also be careful not to over-mix (this comes into play when adding the milk and then again adding the egg-whites). Over-mixing the batter can cause dense, dry, or sunken results.
Whip the egg whites
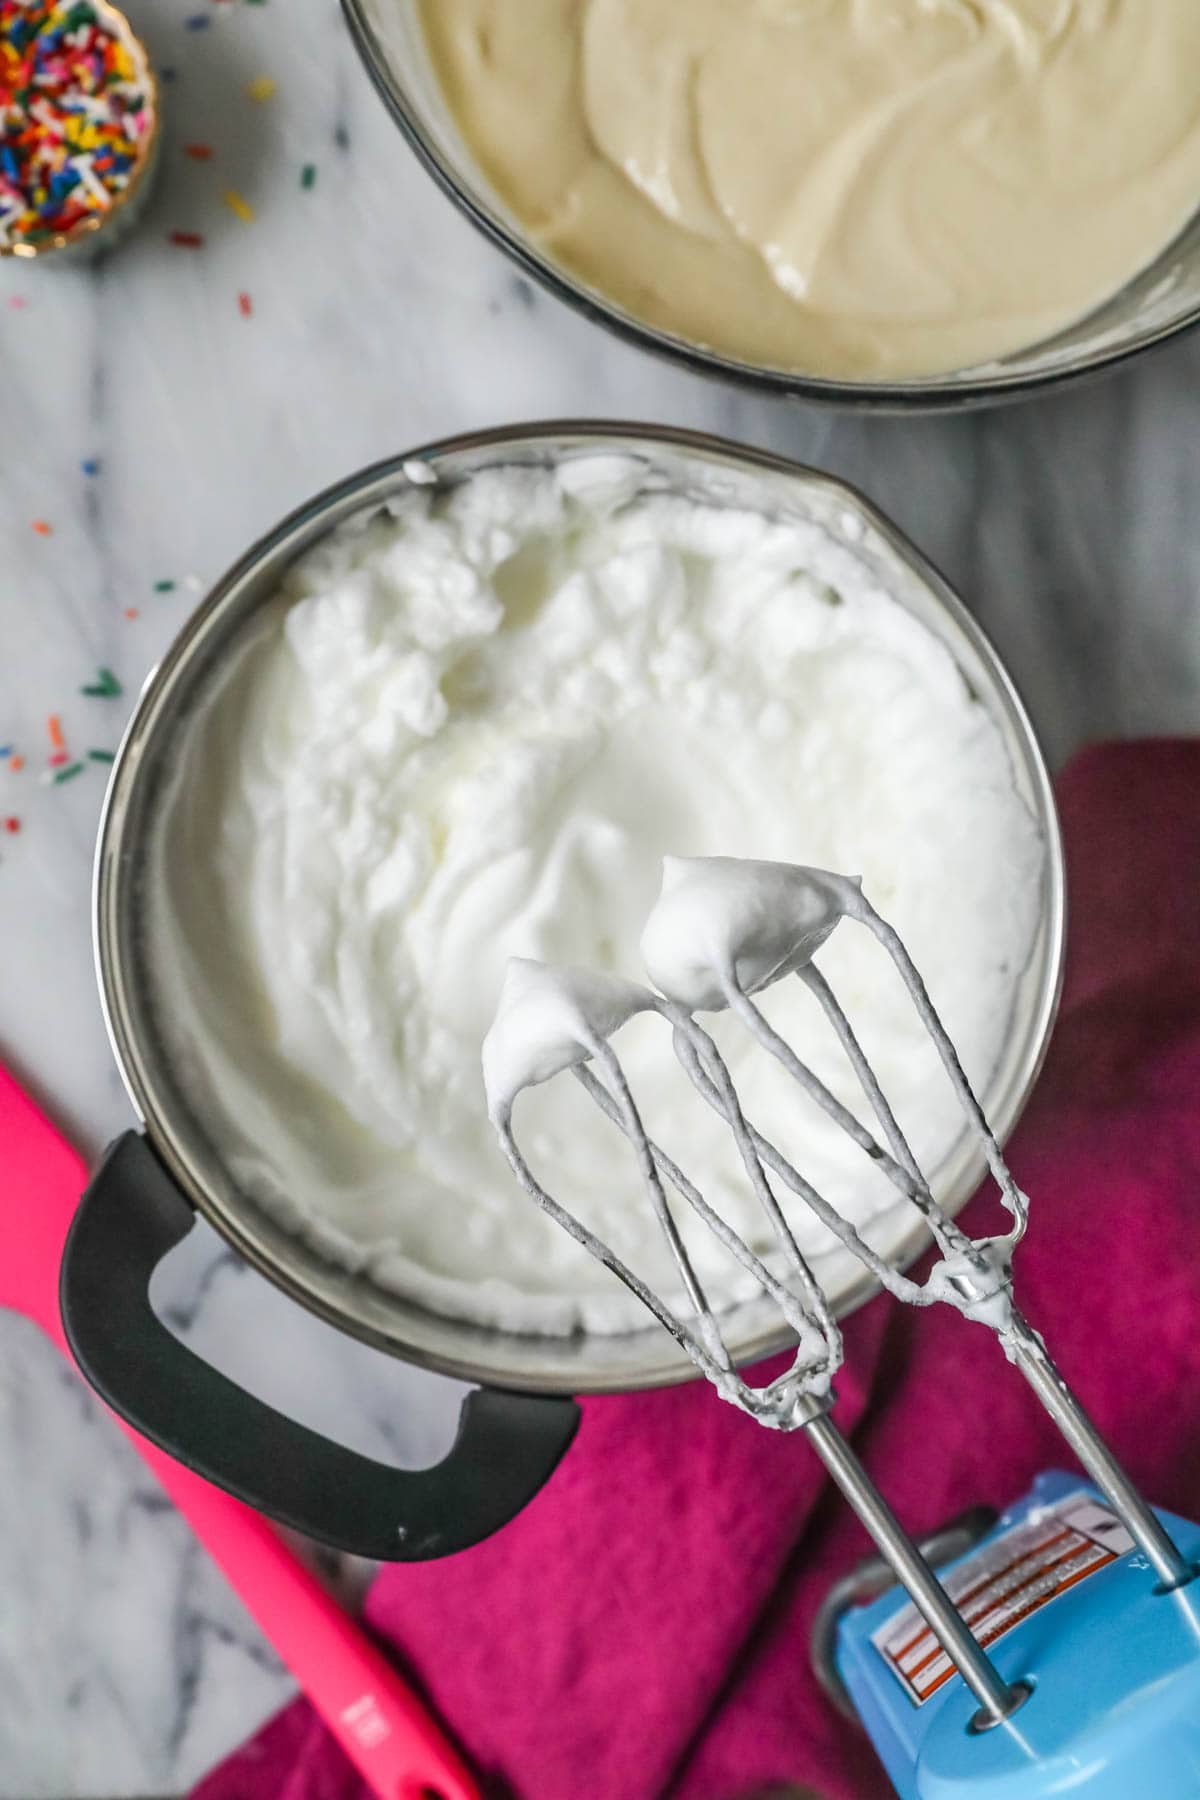
Before you begin, make sure your bowl and beaters are completely clean, dry, and grease-free. Even a tiny bit of grease can prevent your egg whites from whipping properly!
Stiff peaks are our aim here! This means your egg whites will have greatly increased in volume, they’ll be bright white in color, and they’ll be fluffy. To test that you’ve reached stiff peaks, lift your beaters straight out of the whites. The peaks should hold firm without folding over or falling back in on themselves.
Fold in the egg whites and sprinkles
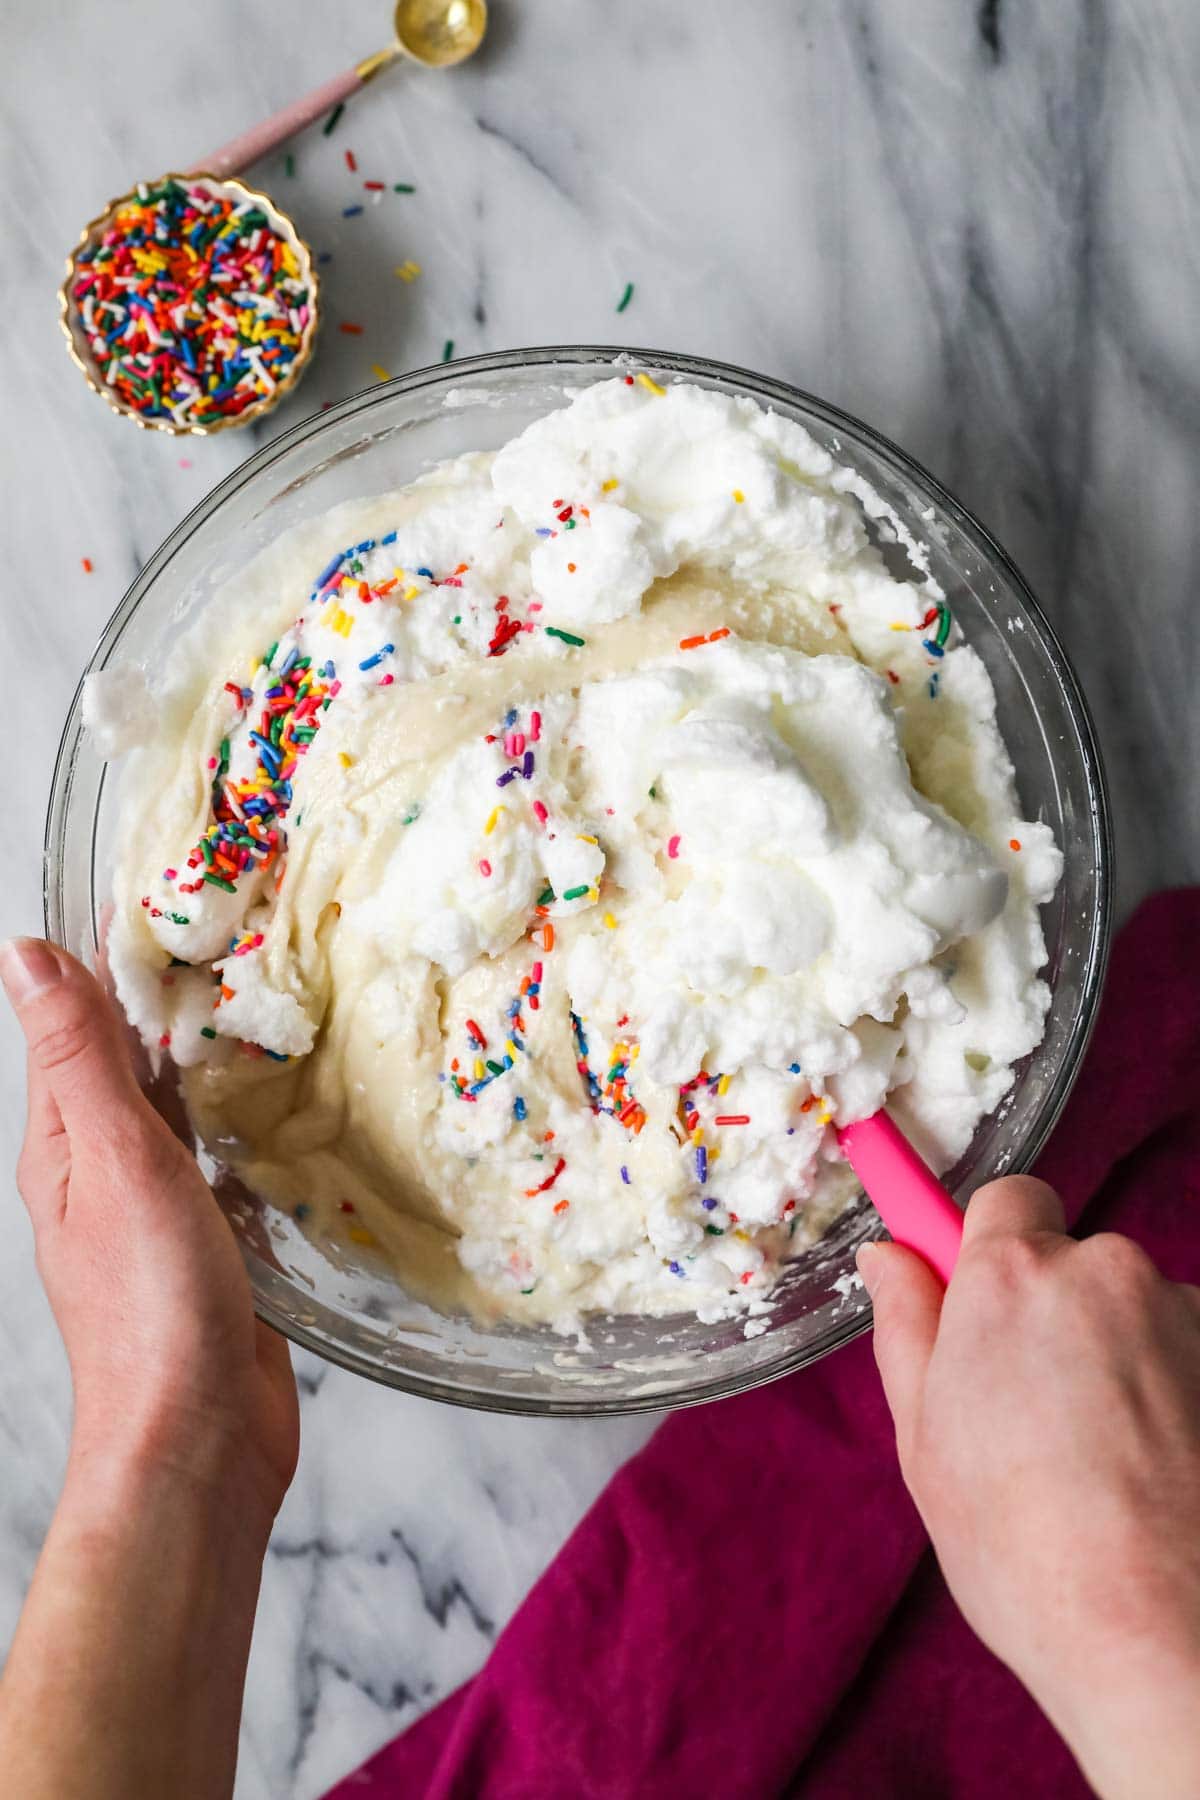
Gently is the way to go! Gently stir in all of the egg whites at once along with your sprinkles.
Use a spatula for this step and not your mixer. Your aim is to NOT over-mix. Instead, the goal is to combine everything without deflating those egg whites we just spent all that time whipping. Make sure to scrape the bottom and sides of the bowl to ensure everything is well combined.
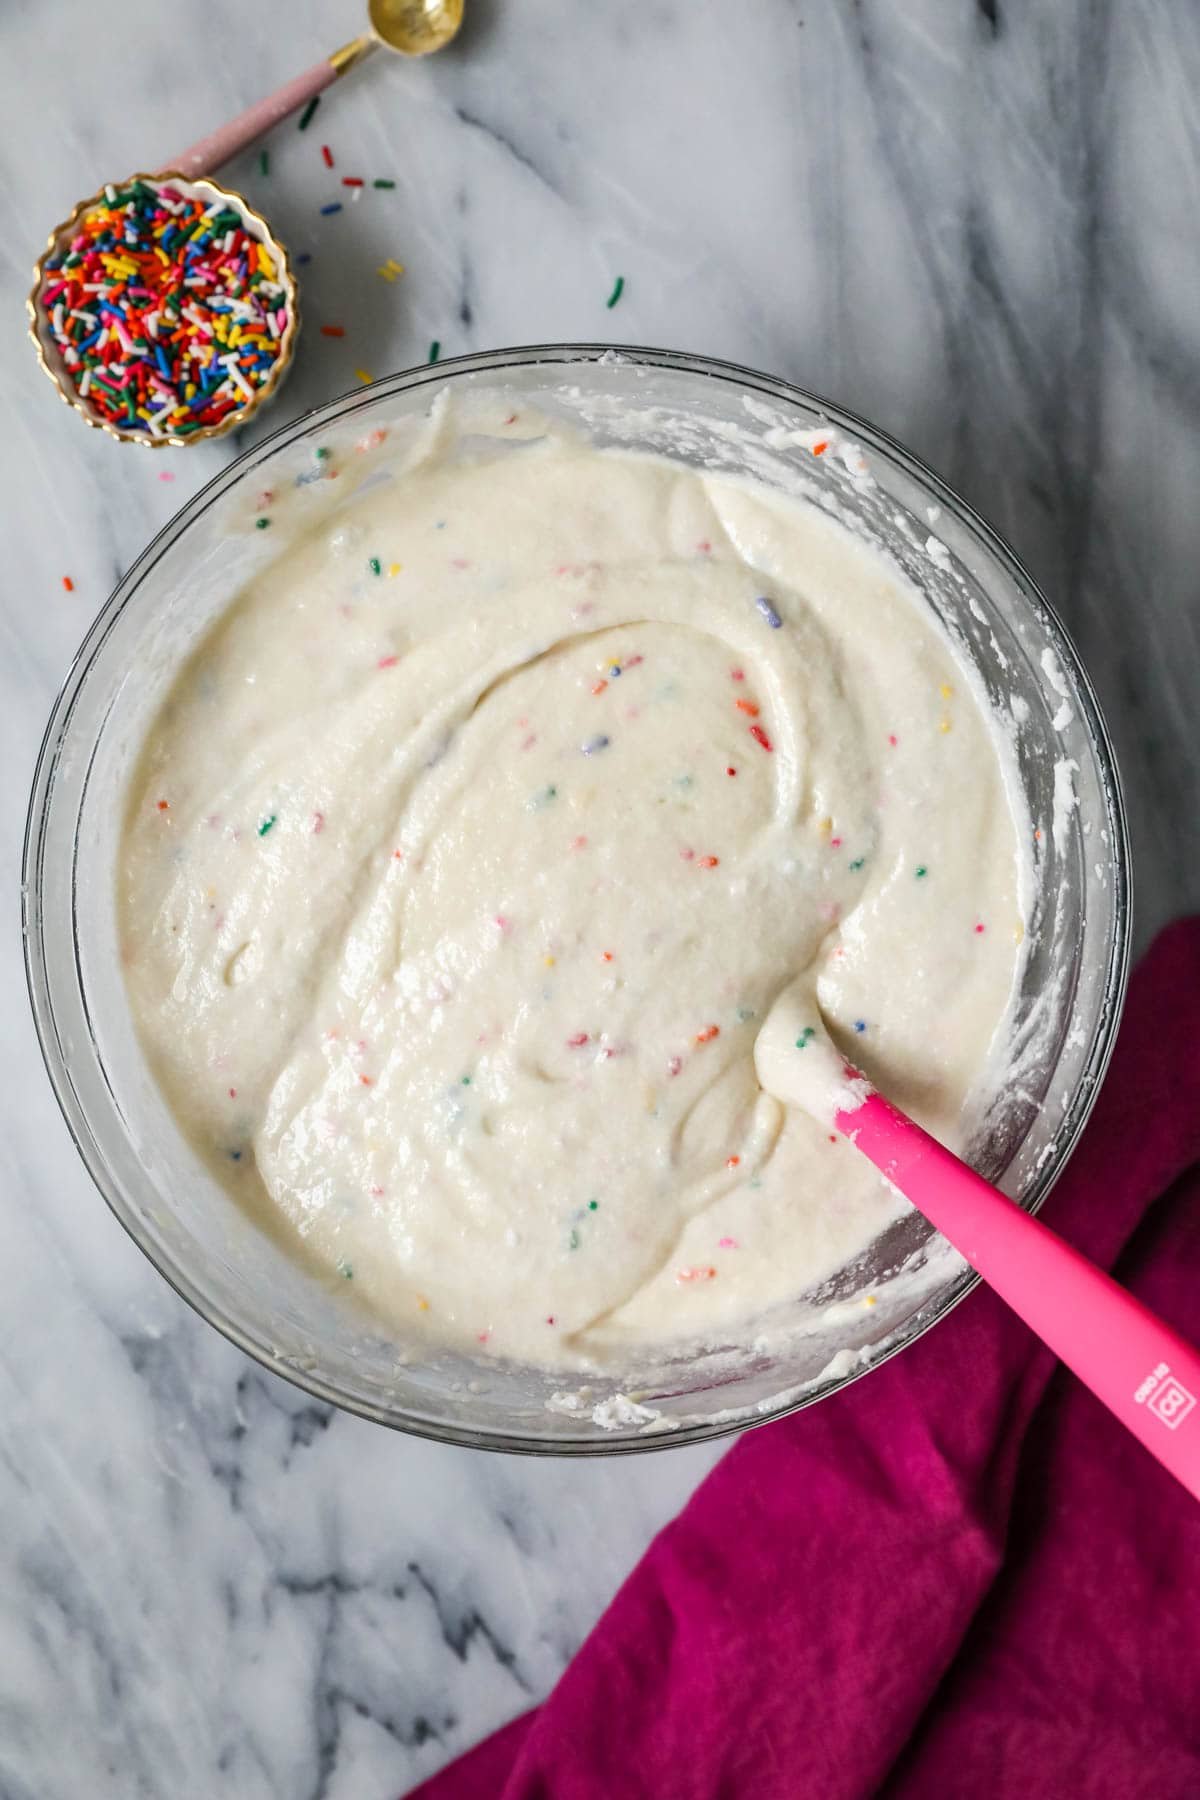
You will lose some of the volume as you fold the batter, but try your hardest to incorporate the egg whites gently without totally deflating them.
Bake

Use the toothpick to test your cakes for doneness; a toothpick inserted in the center of the cake should come out clean or have a few crumbs when inserted in the center of each cake.
It’s important to keep a close eye on your Funfetti cakes as they near the end of the bake time; underbaking your cake can cause it to sink, while over-baking can dry it out (even just a minute or two too long can do this).
The outsides of the cake bake into a pretty golden color, but don’t panic! The insides will still be snow white.
Decorate
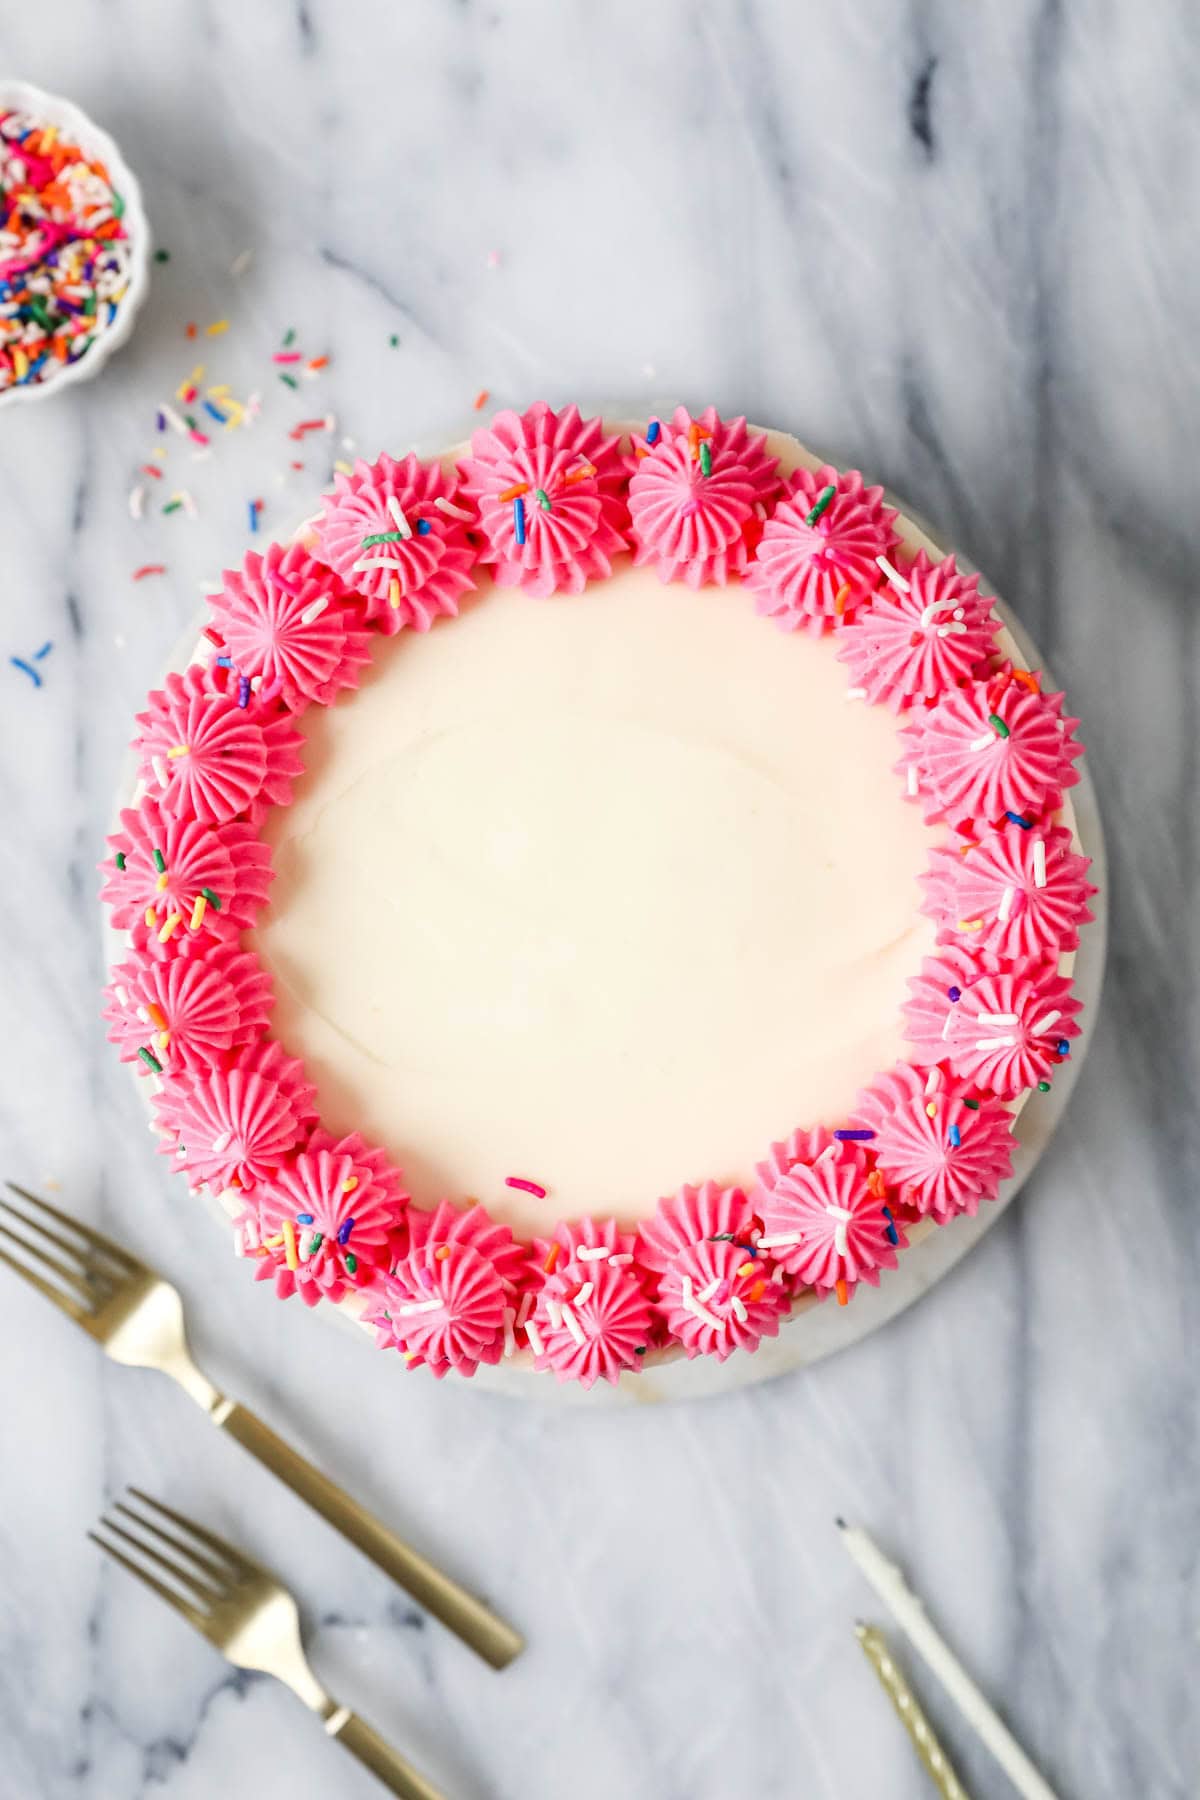
Let the cake layers cool completely before you decorate the cakes. I recommend using my buttercream frosting (in the recipe card below) as it’s a classic Funfetti cake pairing, but I have a whole catalog of frosting recipes that would work well here. Just note that most of those recipes are for 2 layer cakes so you will have to scale up by at least 50%.
I also recommend doing a crumb coating on the cake before decorating. This mean applying a thin layer to the outside of the cake then freezing it for 15 minutes before continuing to decorate. This will catch any crumbs and help your frosting apply more smoothly.
SAM’S TIP: New to cake decorating? I have a guide on how to decorate a cake that’s perfect for for beginner cake decorators! You’ll learn everything from what equipment you need to how to do crumb coat.
Frequently Asked Questions
This recipe makes about 12 cups of batter.
For a two layer Funfetti cake: I recommend you make my white cake recipe and add ⅓ cup of sprinkles. That recipe is actually the same as this one, but scaled down to fit two pans (and doesn’t have sprinkles, obviously!).
For a 9×13″ pan: you would technically need to reduce the recipe by ⅓. This can get tricky, so I usually recommend making the recipe as-is and using the excess batter for cupcakes (though they won’t have nice rounded tops–see below).
If you are looking for a good Funfetti cupcake recipe, I recommend making my confetti cupcakes or white cupcakes (add sprinkles) instead, as those form nice round tops. This recipe makes tasty cupcakes, but they bake up flat.
I do not recommend it, as they provide inconsistent results (and most say they are not meant for whipping). Instead, separate your own eggs and repurpose the yolks in another recipe like my pastry cream, crème brûlée, lemon crumb bars, lemon curd, key lime pie, or chocolate pie.
Yes! To do this, stir the food coloring into the batter before adding the egg whites. Gel food coloring is best for most vibrant color.
A big thank you to every one of you who has already tried my Funfetti cake recipe and reviewed it 💕 I appreciate you!
Enjoy!
Let’s bake together! Subscribe to my newsletter to be notified of all the newest recipes, and find my free recipe tutorials on YouTube 💜

Funfetti Cake from Scratch
Ingredients
- 9 Tablespoons (127 g) unsalted butter softened
- 3 cups (600 g) granulated sugar
- 1 cup (236 ml) neutral cooking oil Use canola, vegetable, or avocado oil
- 4 teaspoons vanilla extract
- 4 cups+ 2 Tbsp (516 g) all-purpose flour (all of the flour goes into the cake batter, you will also need additional flour for preparing the cake pan)
- 4 ½ teaspoons baking powder
- 1 ½ teaspoons table salt
- 1 ½ cup (355 ml) milk
- 9 (315 ml) large egg whites room temperature preferred
- ½ cup (80 g) sprinkles see note
Buttercream
- 1 lb (453 g) unsalted butter softened to room temperature
- ¼ teaspoon salt
- 6 cups (750 g) powdered sugar
- 6 Tbsp (89 ml) heavy cream
- 2 teaspoons LorAnn Princess emulsion or vanilla extract
Recommended Equipment
- Kitchen Scale (recommended)
Instructions
- Preheat oven to 350F (175C) and prepare 3 8-inch round cake pans by generously greasing and flouring (be sure to shake out excess flour) and lining the bottoms of each pan with a round of parchment paper.
- In stand mixer (or using an electric hand mixer), beat butter on medium-low speed until creamy.9 Tablespoons (127 g) unsalted butter
- Add sugar and oil and beat until all ingredients are well-combined and creamy.3 cups (600 g) granulated sugar, 1 cup (236 ml) neutral cooking oil
- Scrape down the sides and bottom of the bowl and then stir in your vanilla extract.4 teaspoons vanilla extract
- In a separate, medium-sized mixing bowl, whisk together your flour, baking powder, and salt.4 cups+ 2 Tbsp (516 g) all-purpose flour, 4 ½ teaspoons baking powder, 1 ½ teaspoons table salt
- Measure out your milk. With mixer on medium speed, gradually alternate between adding the flour mixture and the milk to the butter mixture, starting and ending with the flour mixture. Stir until each one is almost completely combined before adding the next. Pause occasionally to scrape down sides and bottom of bowl.1 ½ cup (355 ml) milk
- In separate mixing bowl (use a clean, dry, and grease-free bowl, use glass or metal), combine your egg whites and stir with an electric mixer, gradually increasing speed from low to high and continuing to beat on high-speed until stiff peaks form.9 (315 ml) large egg whites
- Add egg whites and sprinkles to the batter. Using a spatula, gently fold your egg whites and sprinkles into your batter. Take care to scrape the sides and bottom of the bowl so that ingredients are well-combined, and take care not to over-mix.½ cup (80 g) sprinkles
- Evenly divide cake batter into prepared pans.
- Bake on 350F (175C) for 35-40 minutes, or until a toothpick inserted in the center of each cake layer comes out clean or with few crumbs (should not be wet). For best results, rotate your cake pans halfway through baking to ensure even baking. Cakes will be a light golden brown when done baking.
- Remove cakes from oven and allow to cool for 15 minutes. Run a butter knife around the inside rim of each pan and carefully invert each onto a cooling rack.
- Allow to cool completely before frosting.
Frosting
- Place butter in the bowl of a stand mixer in a medium-sized mixing bowl. Use the paddle attachment or an electric mixer to beat butter on medium-speed until smooth and creamy.1 lb (453 g) unsalted butter
- Add salt and beat again for about 20 seconds.¼ teaspoon salt
- Gradually, about 1 cup at a time, add powdered sugar, waiting until each cup is completely mixed before adding the next cup.6 cups (750 g) powdered sugar
- One Tablespoon at a time, add the heavy cream on medium-high speed, waiting until each addition is well-combined before adding the next 2 Tbsp.6 Tbsp (89 ml) heavy cream
- Add flavoring (vanilla extract or emulsion). and stir on medium-high for 30 seconds. Scrape the sides and bottom of the bowl with a spatula to ensure all ingredients are well-combined.2 teaspoons LorAnn Princess emulsion or vanilla extract
- Transfer one layer of your cooled cake to serving platter. Use frosting to ice the top. Add the next layer, ice the top of that. Add your third layer on top and ice the top, and then do a thin “crumb coating” around the entire cake.
- Transfer to freezer for 10-15 minutes, then remove and apply a clean, thick coat of frosting around the entire cake. For more detailed decorating instructions, see my post on how to decorate a cake.
Notes
Sprinkles
Use sprinkles/jimmies or round sequin “quin” sprinkles, do NOT use nonpareils or they may bleed through your batter and ruin the coloring of your cake.Using 9″ pans
This cake may also be made in three 9″ pans, just decrease the baking time. Start checking the cakes for doneness at 25 minutes.Storing
Store this cake tightly covered at room temperature for up to 3 days or in the refrigerator for up to 5 days. This cake may also be frozen, tightly wrapped in plastic wrap then foil, for up to 3 months.Nutrition
Nutritional information is based on third-party calculations and should be considered an estimate only. Actual nutritional content will vary based upon brands used, measuring methods, cooking method, portion sizes, and more.
Recipe originally published 4/13/16 — text and photos updated Feb 2025


Dheera
Hi, i want to make 3 – 6in cakes instead of 8…any suggestions on how to scale down the ingredients
Sam
You could probably cut the recipe in half. The layers will be slightly thinner but not significantly. 🙂
Maria
I made this recipe twice in my very first “cake from scratch” attempt. The first time I am pretty sure that I overfilled the pan and over baked them as one other person reviewed but the flavor was still amazing and my hubby and kids actually enjoyed the crispy corners.
Second attempt I watched them very closely and when they came out they were great! I doubled the recipe for a gathering of close to 50 people and made two shaped sheet cakes and 24 cupcakes. I also made the buttercream recipe from here and had so many compliments on how moist and fluffy the cake was!
It has been bookmarked for future use!
Sam
I am so glad everyone enjoyed it so much, Maria! Hopefully they will continue to enjoy it for years to come. 🙂
Jessica VanLiew
Hi,
I just made this recipe and I’m so excited to try it. Next cake I was thinking adding almond extract instead of vanilla, do you think that will work with this recipe?
Sam
Hi Jessica! Yes, I actually recommend still using some vanilla (I like the depth of flavor it adds), maybe a teaspoon, and then exactly how much almond extract you use will vary depending on your personal preference, but keep in mind it is much more potent than vanilla extract so you will not need as much almond extract as you would vanilla, if that makes sense. Enjoy!
Nancy
I made the recipe for my granddaughter’s 3rd bday. I followed recipe to a T but was disappointed. The cake was very dense and a bit dry. I expected a light Funfetti Cake.
Sam
Hi, Nancy! That’s very frustrating and this is definitely meant to be a light and fluffy, moist cake (it’s why I love it so much!). Unfortunately the most likely culprit of a dense/dry cake is over-mixing (this will make the cake dense in a hurry, make sure you’re combining wet and dry ingredients by hand), not whipping the egg whites fully to stiff peaks (will make the cake dense, make sure you also use a gentle hand when folding into the batter), and baking a bit too long (will make the cake dry, or could your oven be running hotter than it lets on?). I suspect one of these things is the culprit as to why you didn’t get the light and fluffy results that you can see here in the photos.
kelly clark
Hello, how would you suggest storing the cake/ can it be made in advance? Would you leave it in an air tight container on the counter?
Thanks!!
Sam
Hi Kelly! I personally recommend keeping in an airtight container at room temperature for up to two days. If storing longer than that, store in an airtight container in the fridge (just keep in mind the fridge can dry out cakes). I hope that helps! 🙂
Samantha P.
I am thinking I did something wrong with this cake, but i don’t feel as though I did.:) But, I made this last night and it was a huge disappointment. I mixed everything properly, beat the egg whites until stiff peaks formed, and then gently folded them into the batter. I made 12 cupcakes, two 6″ layers, and 4-4″ heart cakes. Every single one of them overflowed the pans they were in, and fell in the middle. The portion of the batter that overflowed then cooked to a hard crust. The 6″ layers were completely hard on the outside and I was unable to slice through them without using a serrated knife. Any guidance would be much appreciated as the batter itself tasted amazing.
Sam
I’m so disappointed to hear this, Samantha! 🙁 If they over-flowed then sunk the pans were most likely over-filled. Make sure you don’t fill any pan higher than 2/3 of the way full. If they were too hard to cut you may have over-baked the cakes. Always keep an eye on them and use the toothpick test to determine if they are done or not. The toothpick should come out with a few moist crumbs. I hope it goes better next time. 🙁
Lora
Planning to try this out. The princess emulsion seems really interesting, but I’m not sure I want to buy a bottle of it to try it out. Is there a mixture of extracts you feel would yield a similar result? Like half vanilla half lemon. It sound nice, but clearly I haven’t tasted it so…let me know, please!
Sam
Hi Lora! I would try mixing vanilla and a teeny tiny bit of lemon and almond extract. 🙂
Julie
Hi,
I’d like to try this recipe, but any tips on how to make these into cupcake format?
Sam
Hi Julie! Bake the cupcakes on the same temperature for about 17 minutes. 🙂
Colleen
Do you have a weight measurement for the egg whites? I was going to use liquid egg whites rather than eggs.
I made your rainbow cake and absolutely loved it as did everyone who tried it!
Sam
Hi Colleen! I tend to not recommend the egg whites in a carton because they can be difficult to whip to stiff peaks. If you do want to try it, for me, a large egg white is typically about 35 grams. I have heard mixed results using the egg whites in a carton.
Diana
I’m planning on making this tomorrow. Do you think Oat Milk would be okay in the batter?
Sugar Spun Run
Hi, Diana! I am not sure how it will do. I have found the oat milk or almond milk tends to dry out the cakes, therefore, I do not reccomend using it.
Diana
I made it with the oat milk and I feel like it turned out great! Next time I will try it with dairy milk and see if there’s a difference.
Sam
I’m glad it turned out! Thanks for the feedback. 🙂
Sonia
HI!
How long should I bake a 13 by 9 cake for?
Thank you!!
Sam
Hi Sonia! I haven’t tried it in a 9 x 13 so I’m not sure of a bake time. This cake will make too much batter for a 9 x 13 so make sure you don’t overfill the pan.
Kenz
I just made this yesterday, and OMG. I don’t normally like cake, but I can’t stop eating this one. SO GOOD!
Sam
I’m so glad you enjoyed it so much! 🙂
Michelle
Hey girl it’s looks so good! What’s wrong with mine if the batter is really liquidy? I feel like i messed something up with the egg whites.
Sam
Hi Michelle! If you didn’t get your egg whites to stiff peaks it could be causing issues. Also if you don’t have enough flour or too much of your wet ingredients you could be running into issues as well there. Unfortunately without being there to see it’s hard to pinpoint exactly what could be going wrong.
Sabri
Hi Sam!
This looks absolutely delicious. I was looking for a beautiful funfetti cake recipe for my son’s birthday and I think I have found it.
I have a question, I’d like to make a three layer 6 inch cake. Should I modify the baking time/temperature?
Thank you!
Sam
Hi Sabri! You won’t want to change the temperature the cakes will just bake for less time. I’m not sure what the bake time would be, just be sure to keep an eye on them so you don’t over-bake them. This will make a lot more batter than you need for 3 6 inch layers so make sure not to overfill your pans. I hope you love the cake! 🙂
Aarushi
How long did you wait to cool the cakes? Also, did you end up cutting the tops of the cake to make it easier to stack?
Sam
The cakes can take a little while to cool, but you want to make sure it is completely cooled before frosting. This cake typically comes out pretty uniform so I don’t really need to trim it to stack it. 🙂
Katrina
Ahh this is a fabulous recipe!!! I just made tonight for a virtual gender reveal party I’m making a cake for this weekend! They only wanted a 3 layer 6 inch cake so I was able to get a dozen and a half cupcakes out of this batter as well! So of course I sampled and they are so lovely and light and delicious!
One quick question I should have asked before… if I tightly wrap these and freeze them will they keep well? I’m planning to frost and decorate Friday night! Thanks!!!
Sam
I am so glad it turned out so well! These cakes will hold up nicely in the freezer. 🙂
Katrina
Great! Thank you so much!
Erika
Hi!! I absolutely love this recipe and have made it many times! I was thinking about making cupcakes instead, this time around. Do you have any idea how many cupcakes this will yield?(:
Sam
Hi Erika! It will probably yield about 45 cupcakes. You will want to bake them on 350 for 18 minutes. 🙂